
New Ultimate Guide How to Live Stream on Facebook, In 2024
[Ultimate Guide] How to Live Stream on Facebook?
A lot of people consume Facebook Live content as it provides a fun experience for the audience. Today, Facebook Live is being displayed across all genres. From gaming, vlogging, and sports, to basically anything under the Sun, going live on Facebook has become a new trend.
However, even to this date, a lot of users are confused about how to livestream on Facebook. That is why we have created this guide so you can livestream on Facebook without any hassle.
Part 1: Easy-to-follow Step Guidance to Start Facebook Live
Facebook Live video is one of the most sought-after features of all time. Not only does it help creators connect with their audience but it lets them generate more revenue, ultimately bringing more money to their account.
Moreover, it is an awesome way to reach a broader audience and let people discover your content in real-time. A lot of people are confused about how to use Facebook Live because the methods to use it on the mobile app, the web, and Creator Studio are all different.
So, let’s talk about how to go live on Facebook. Before you start, you should understand that you can live stream to your page, group, profile, and event using the Facebook app or using a camera and streaming software.
01 How to go live on Facebook using a phone
As we have already discovered, you can go live on your Facebook page, group, profile, and event from anywhere in the world. The best way to go about life in the modern world is to use the Facebook app which is available on both Android and iOS.
Here is a complete guide on how to use Facebook Live streaming services on your mobile.
Step 1 Choosing where to go live (Personal Profile, Group, or Page)
The first step is choosing where you want to live. Ask yourself where are you trying to go live. Is it on your personal profile, a Facebook page that you own, or in some group? Navigate to wherever you want to go live.
Step 2 Going live
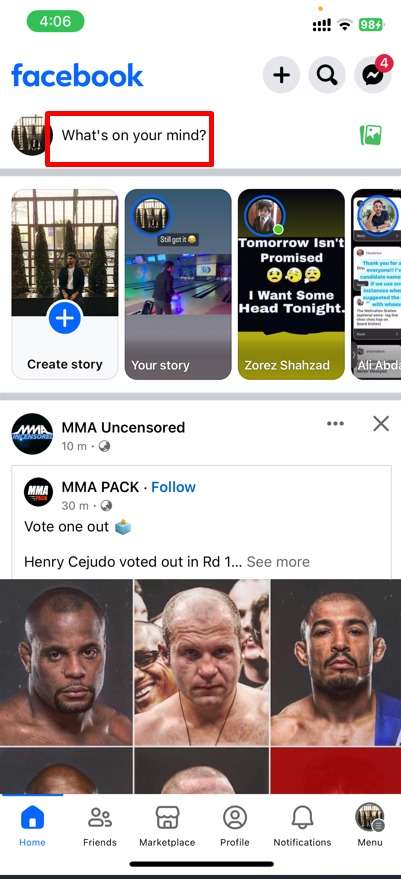
Let’s say that you want to go live on your personal Facebook profile. Then, you need to click on the Facebook app, and click on What’s on your mind? Select Live Video which will be an option available. Now, you will start to see that new features will appear and you will need to set details about your livestreams in the next step.
Step 3 Setting live stream details and going live
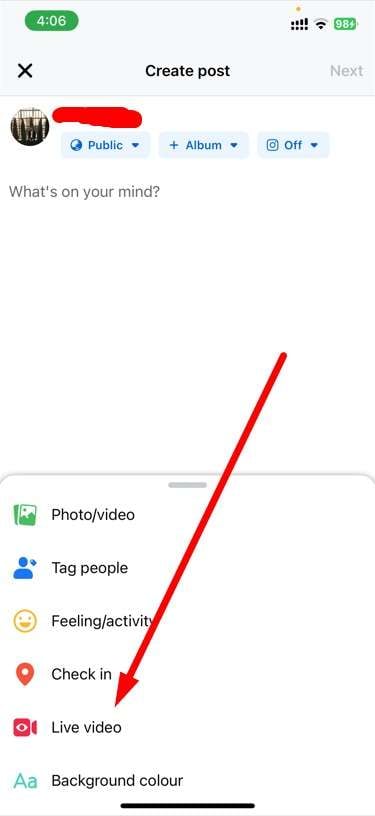
Now you will need to give Facebook access to your camera and microphone, add a description to your video, set effects of your liking, and adjust everything accordingly. You can also invite your friends to join and watch the live video. So set those options and click on Go Live.
Step 4 Finishing the live stream
Once you have completed the live stream, simply click the Finish button to end your broadcast. In just a couple of minutes, your livestream will be ready in the form of a video.
02 How to go live on Facebook using the web
When you use the web version of Facebook, you will be redirected to Live Producer, which is a tool that allows you to use higher-end production equipment and streaming software. This happens on both laptops and PCs.
If you are a Facebook live streamer and want to go live using the web, then follow these steps.
Step 1 Find the Live video option on Facebook
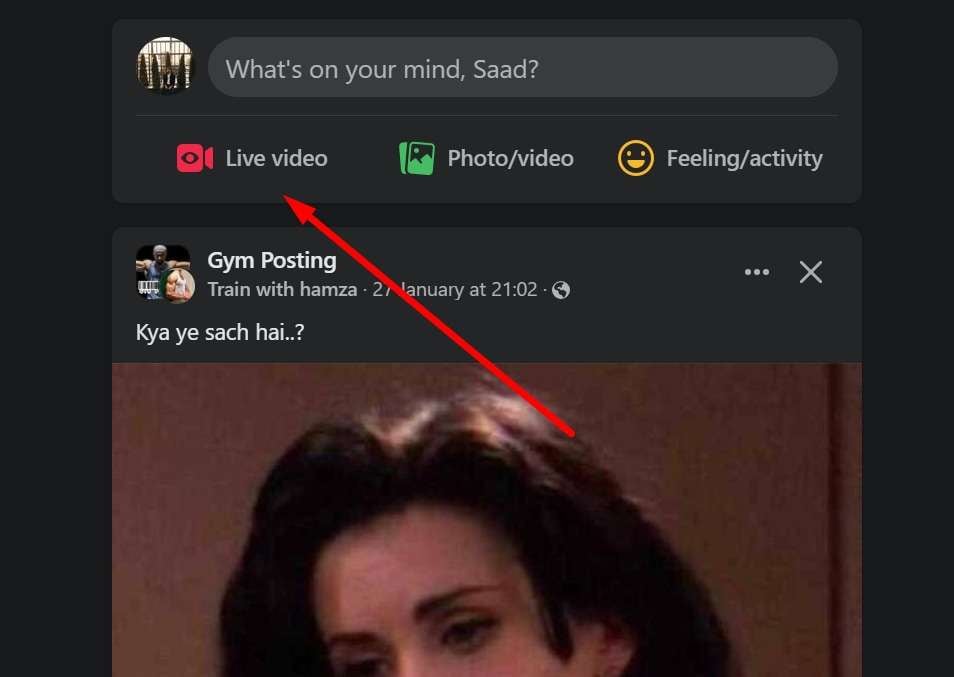
Firstly, you will need to be logged in to your Facebook account. Once you are logged in, at the top of the News Feed, click on the What’s on your mind section and click on the three dots action button. There, you will find Live Video which will ultimately redirect you to Live Producer. So click on it.
Step 2 Setting up livestream
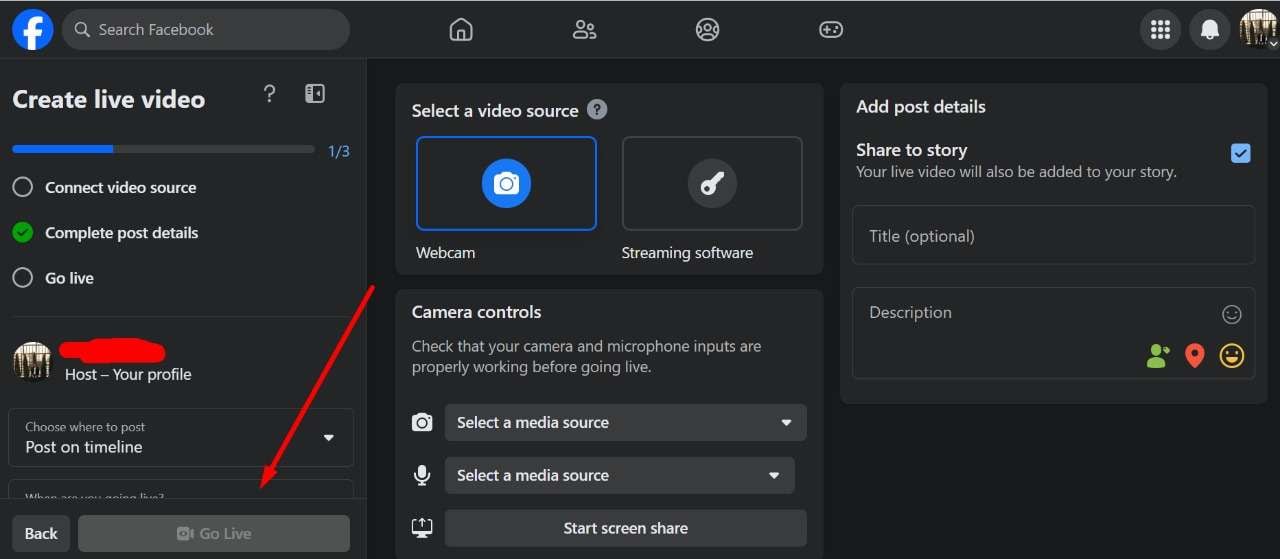
Once you are on Facebook Live Producer, you can add your title, and description, choose the equipment, and set a lot of things right on your Facebook account. You can do this before the live stream starts which is great because you can start live in a professional manner.
Step 3 Start your live stream on Web
Once everything is good to go, simply click on Go Live and you will be able to share your story with the rest of the world. You can also end the live stream whenever you like.
Part 2: Selected Tool to Elevate Your Facebook Live Experience
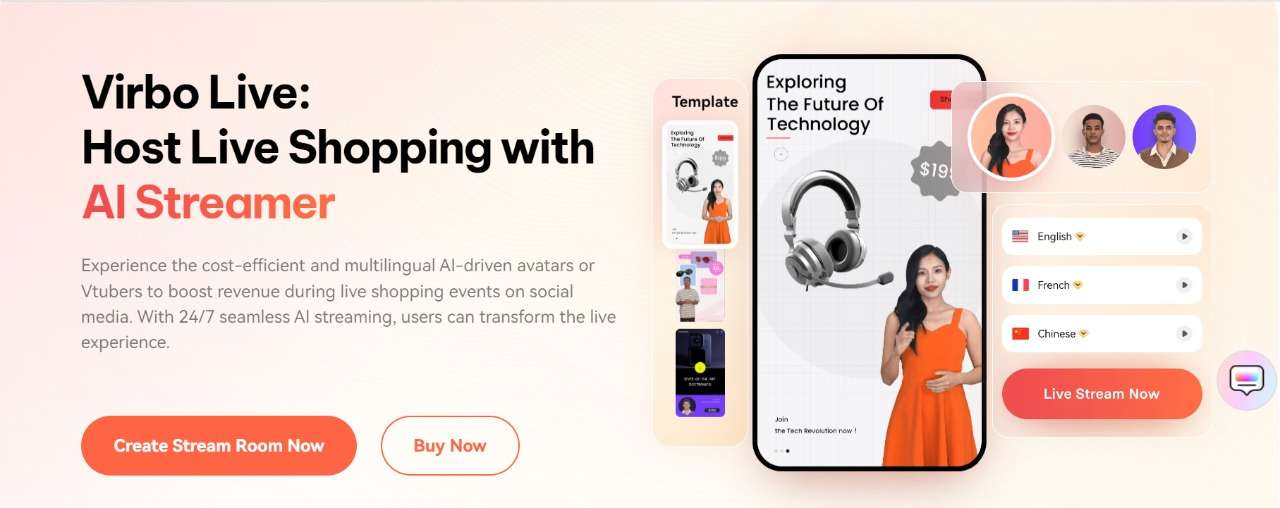
If you want to take your Facebook streaming to the next level, then you should try Virbo Live . Virbo is an all-in-one AI platform that allows users to create high-quality content with 300+ voices and a plethora of powerful features.
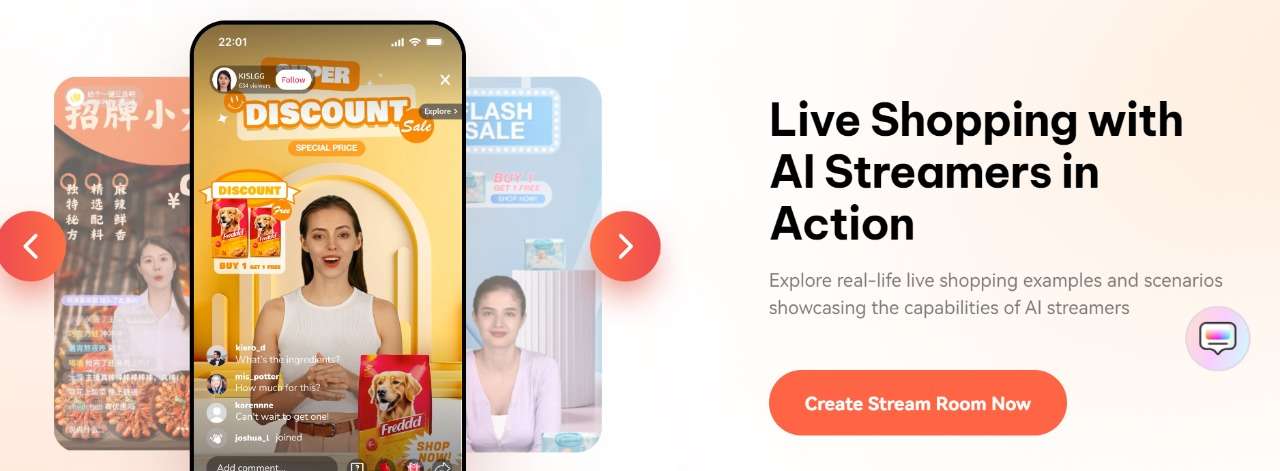
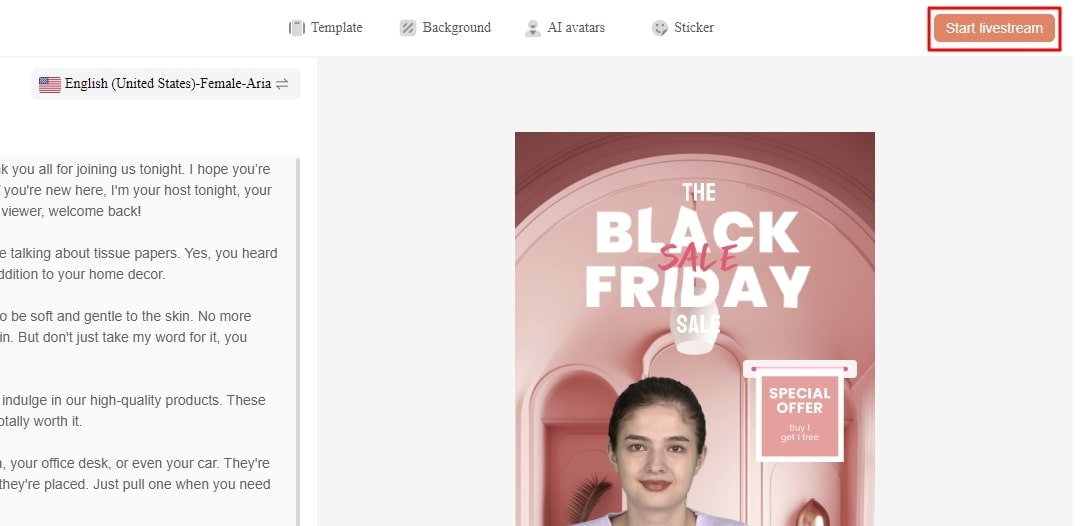
Virbo Live aims to transform the live experience by adding AI into play and improving traditional Facebook live streaming. Using Virbo Live is simple. You need to create a live shopping room where you can create a room or simply select a template. Then, you can choose the AI models and background. You can also choose the text and the voice that you want to be played during the live stream. And lastly, you can interact with your audience in the most user-friendly way possible.
For Facebook live streaming, Virbo Live is one of the most amazing tools that is transforming traditional boring live shopping into an AI-driven shopping experience. Let’s discover some of the features related to Facebook Live.
Features of Virbo Live
- Cost-effective: When it comes to going live on Facebook using the traditional method, you will need a lot of equipment like a camera, mic, and more. With Virbo Live, you don’t need anything because everything is handled by AI.
- 24/7 broadcasting: The regular Facebook live stream can be interrupted but with Virbo Live, you get continuous 24/7 broadcasting without interruptions.
- Live shopping made it easier: Virbo Live makes it easier for brands to showcase their products in the most user-friendly way possible. You can have the AI describe everything as your product gets bought by the audience.
Part 3: FAQs about Facebook Live
1. How do you get to Facebook Live?
You get a live stream on Facebook by using the live streaming feature. To do that, you either need to have a PC, Android, or iOS device. If you are on PC, you can simply log in to Facebook Web. But on mobile devices, you need to have the Facebook app or the Creators app downloaded to go live.
2. Can you watch Facebook Live without an account?
Facebook live videos are public, meaning you can watch them on any device as long as you have the internet. Moreover, Facebook live videos don’t require an active Facebook account to be played as they are usually public.
3. Is Facebook Live stream free?
Yes, Facebook live streaming is 100% free, meaning you don’t have to pay a penny to use any of the features. However, if you use a third-party tool, then you might need to pay to get some features unlocked.
4. Is YouTube Live better than Facebook Live?
Both YouTube Live and Facebook Live are perfect for streaming. However, if your goal is monetization and making money, then using YouTube Live would be better. However, if you want to interact with your audience and make your community grow, then Facebook Live is the best choice.
Conclusion
Facebook streams are a fun and engaging way to interact with the audience. In this guide, we have covered a complete guide that you can follow to get live on your Facebook and reach a broader audience.
And if you want to take your Facebook live streaming to the next level, then a tool like Virbo AI will be perfect for businesses that want to bring in more revenue and reach a bigger audience.
A lot of people consume Facebook Live content as it provides a fun experience for the audience. Today, Facebook Live is being displayed across all genres. From gaming, vlogging, and sports, to basically anything under the Sun, going live on Facebook has become a new trend.
However, even to this date, a lot of users are confused about how to livestream on Facebook. That is why we have created this guide so you can livestream on Facebook without any hassle.
Part 1: Easy-to-follow Step Guidance to Start Facebook Live
Facebook Live video is one of the most sought-after features of all time. Not only does it help creators connect with their audience but it lets them generate more revenue, ultimately bringing more money to their account.
Moreover, it is an awesome way to reach a broader audience and let people discover your content in real-time. A lot of people are confused about how to use Facebook Live because the methods to use it on the mobile app, the web, and Creator Studio are all different.
So, let’s talk about how to go live on Facebook. Before you start, you should understand that you can live stream to your page, group, profile, and event using the Facebook app or using a camera and streaming software.
01 How to go live on Facebook using a phone
As we have already discovered, you can go live on your Facebook page, group, profile, and event from anywhere in the world. The best way to go about life in the modern world is to use the Facebook app which is available on both Android and iOS.
Here is a complete guide on how to use Facebook Live streaming services on your mobile.
Step 1 Choosing where to go live (Personal Profile, Group, or Page)
The first step is choosing where you want to live. Ask yourself where are you trying to go live. Is it on your personal profile, a Facebook page that you own, or in some group? Navigate to wherever you want to go live.
Step 2 Going live
Let’s say that you want to go live on your personal Facebook profile. Then, you need to click on the Facebook app, and click on What’s on your mind? Select Live Video which will be an option available. Now, you will start to see that new features will appear and you will need to set details about your livestreams in the next step.
Step 3 Setting live stream details and going live
Now you will need to give Facebook access to your camera and microphone, add a description to your video, set effects of your liking, and adjust everything accordingly. You can also invite your friends to join and watch the live video. So set those options and click on Go Live.
Step 4 Finishing the live stream
Once you have completed the live stream, simply click the Finish button to end your broadcast. In just a couple of minutes, your livestream will be ready in the form of a video.
02 How to go live on Facebook using the web
When you use the web version of Facebook, you will be redirected to Live Producer, which is a tool that allows you to use higher-end production equipment and streaming software. This happens on both laptops and PCs.
If you are a Facebook live streamer and want to go live using the web, then follow these steps.
Step 1 Find the Live video option on Facebook
Firstly, you will need to be logged in to your Facebook account. Once you are logged in, at the top of the News Feed, click on the What’s on your mind section and click on the three dots action button. There, you will find Live Video which will ultimately redirect you to Live Producer. So click on it.
Step 2 Setting up livestream
Once you are on Facebook Live Producer, you can add your title, and description, choose the equipment, and set a lot of things right on your Facebook account. You can do this before the live stream starts which is great because you can start live in a professional manner.
Step 3 Start your live stream on Web
Once everything is good to go, simply click on Go Live and you will be able to share your story with the rest of the world. You can also end the live stream whenever you like.
Part 2: Selected Tool to Elevate Your Facebook Live Experience
If you want to take your Facebook streaming to the next level, then you should try Virbo Live . Virbo is an all-in-one AI platform that allows users to create high-quality content with 300+ voices and a plethora of powerful features.
Virbo Live aims to transform the live experience by adding AI into play and improving traditional Facebook live streaming. Using Virbo Live is simple. You need to create a live shopping room where you can create a room or simply select a template. Then, you can choose the AI models and background. You can also choose the text and the voice that you want to be played during the live stream. And lastly, you can interact with your audience in the most user-friendly way possible.
For Facebook live streaming, Virbo Live is one of the most amazing tools that is transforming traditional boring live shopping into an AI-driven shopping experience. Let’s discover some of the features related to Facebook Live.
Features of Virbo Live
- Cost-effective: When it comes to going live on Facebook using the traditional method, you will need a lot of equipment like a camera, mic, and more. With Virbo Live, you don’t need anything because everything is handled by AI.
- 24/7 broadcasting: The regular Facebook live stream can be interrupted but with Virbo Live, you get continuous 24/7 broadcasting without interruptions.
- Live shopping made it easier: Virbo Live makes it easier for brands to showcase their products in the most user-friendly way possible. You can have the AI describe everything as your product gets bought by the audience.
Part 3: FAQs about Facebook Live
1. How do you get to Facebook Live?
You get a live stream on Facebook by using the live streaming feature. To do that, you either need to have a PC, Android, or iOS device. If you are on PC, you can simply log in to Facebook Web. But on mobile devices, you need to have the Facebook app or the Creators app downloaded to go live.
2. Can you watch Facebook Live without an account?
Facebook live videos are public, meaning you can watch them on any device as long as you have the internet. Moreover, Facebook live videos don’t require an active Facebook account to be played as they are usually public.
3. Is Facebook Live stream free?
Yes, Facebook live streaming is 100% free, meaning you don’t have to pay a penny to use any of the features. However, if you use a third-party tool, then you might need to pay to get some features unlocked.
4. Is YouTube Live better than Facebook Live?
Both YouTube Live and Facebook Live are perfect for streaming. However, if your goal is monetization and making money, then using YouTube Live would be better. However, if you want to interact with your audience and make your community grow, then Facebook Live is the best choice.
Conclusion
Facebook streams are a fun and engaging way to interact with the audience. In this guide, we have covered a complete guide that you can follow to get live on your Facebook and reach a broader audience.
And if you want to take your Facebook live streaming to the next level, then a tool like Virbo AI will be perfect for businesses that want to bring in more revenue and reach a bigger audience.
Facebook Live Shopping: A Comprehensive Guide
After the COVID-19 pandemic, people started trusting online shopping. Therefore, a live shopping trend emerged, which felt like a one-on-one conversation between shopkeepers and buyers. In this regard, different platforms developed and facilitated live shopping. Yet, many features and options need to be introduced for an evener shopping experience.
Considering this scenario, major tech giants like Meta entered the market. They released a Facebook live shopping feature and pushed the boundaries of e-commerce. If you are new to this tech-based shopping or selling, this guide is for you. However, read it by the end to get comprehensive insights on Facebook live selling and shopping.
Part 1. A Brief Introduction to Facebook Live Shopping
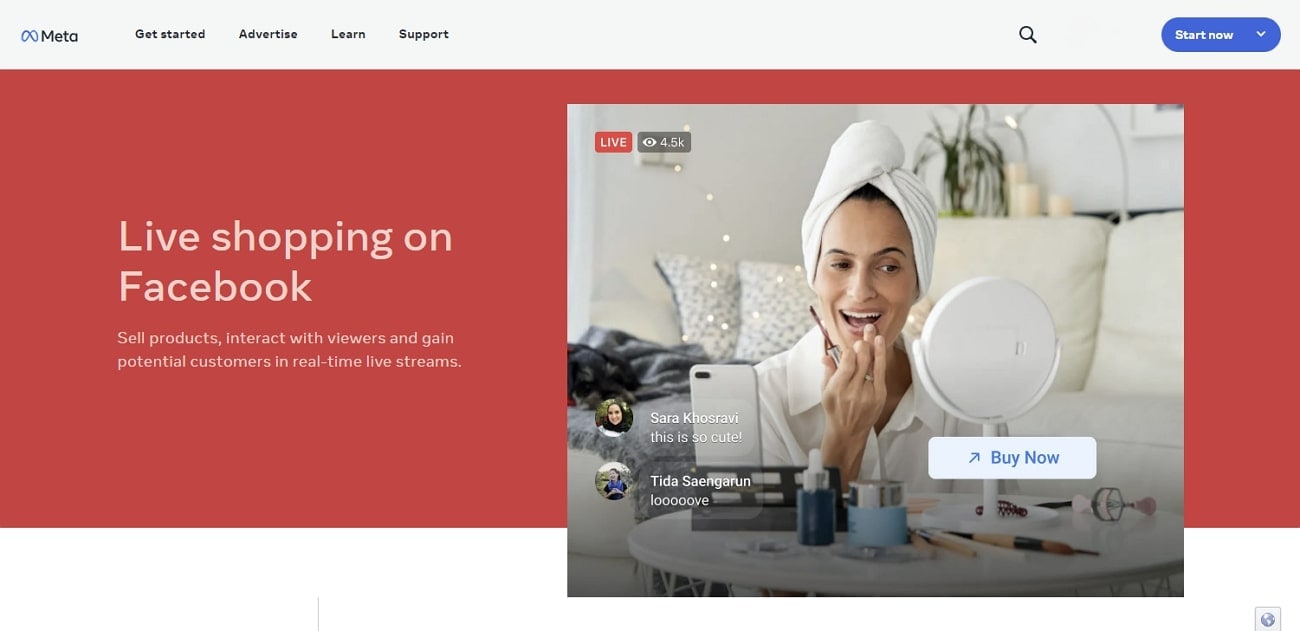
Facebook live shopping is a free tool to interact directly with sellers during a live video. It is among the top livestream shopping platforms in the US, and it was launched in 2021. Retailers connect with buyers while showing their items in real-world scenarios through this service. Facebook lets them tag their product in live streaming, containing website links to place orders.
According to statistics , 82% of consumers prefer livestream content from brands. Besides, 80% of the brands prefer Facebook to market their product through live videos. Still, the e-commerce market continues to develop and address loopholes in live selling with care. Anyhow, look into the perks of Facebook live selling features discussed ahead:
1. Facebook Live Shopping Notification
To bring viewer traffic, Facebook sends notifications to customers. People get notified via Messenger or Facebook notifications about their favorite brand’s live selling. This way, merchants can attract the maximum number of customers.
2. Product Demonstration
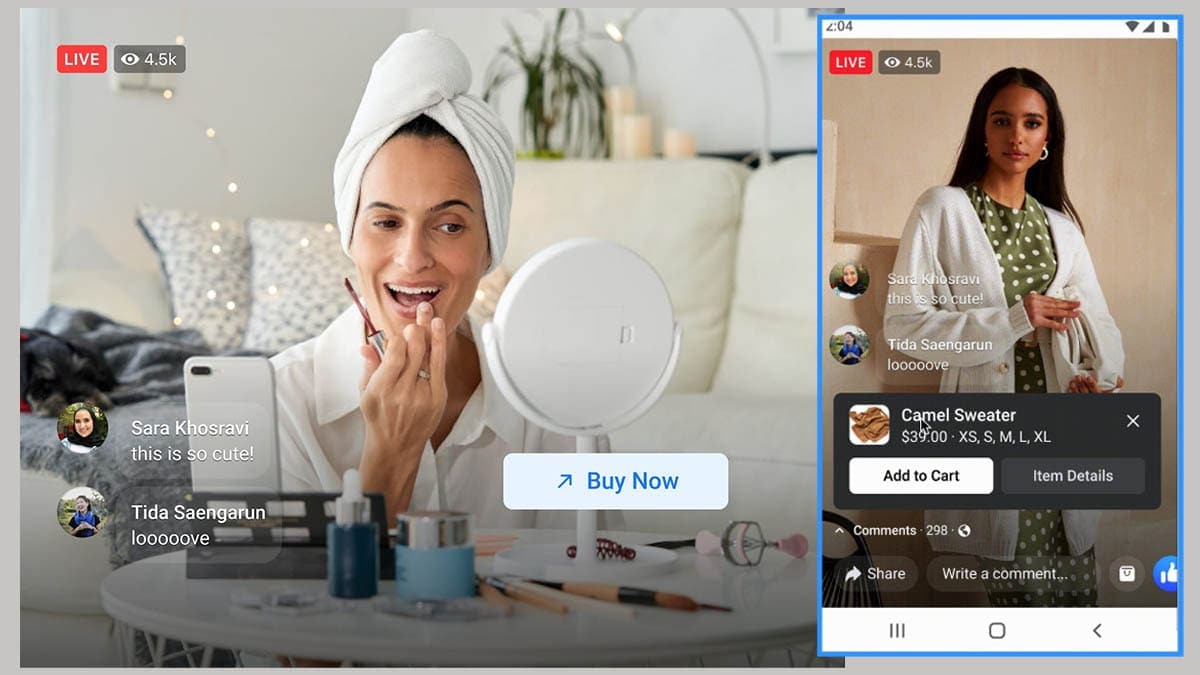
Live shopping has completely changed traditional online shopping. Unlike static photos of a product, selling live on Facebooklive shopping allows you to see how the product works. In the live session, potential customers can see how it looks, in which size it is available, and its exact color.
3. Easy Product Management
Before going live, the host can set up a shopping playlist with categories. Also, they can tag product details and website links before going live. As a result, people can easily navigate to the product, add it to their cart, and purchase directly. During the session, anyone can ask questions through the live chat feature.
Part 2. A Beginner’s Guide to Setting Up a Facebook Live Shopping for Your Product
After understanding these features, sellers can set up their shop. For this purpose, review this section and learn to set up your Facebook shop. Below are some details on how to create a shopping profile on Facebook:
Requirements: Firstly, check your business location, which must be based in the USA. Plus, your business can be located in 21 exempt countries in America, Europe, and Asia. Afterward, create a Facebook business page where you carry an admin role. Then, ensure that Facebook supports your country’s currency. Later, verify your product is complying with Facebook’s commerce policies.
- Step 1. Sign in or create a Facebook page containing all information about your brand. Then, go directly to the Meta Business page and hit the “Live” button in the “Create” section.
- Step 2. From the top bar of your Meta Business page, tap the “Live Shopping” option. There, toggle the “Enable Live Shopping” option and go to stream your first shopping session.

Upon creating an account and choosing a suitable product niche, it’s time to feature them. To learn how sellers feature products, review these steps and make your items visible to viewers:
- Step 1. As you enable the live shopping option earlier, click the “Commerce Manager” to discover the Live Shopping feature in the “Promotions” tab. Continue to select the “Create Playlist” button for setting up a product playlist for live shopping.
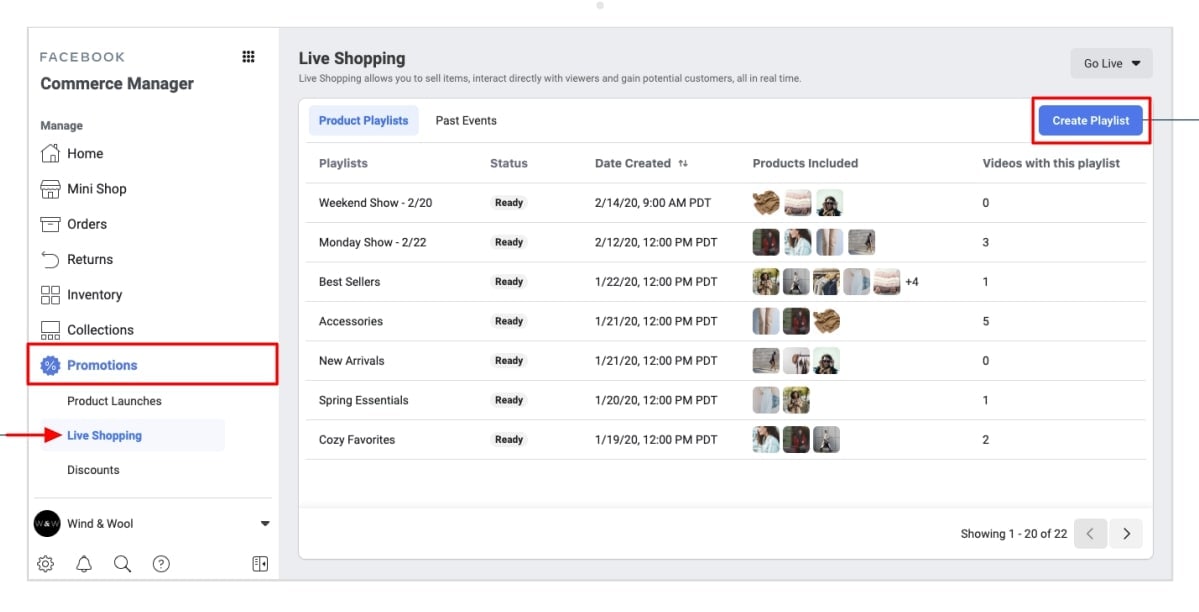
- Step 2. This opens up a new window where you have to provide all the details involving the product. Add the product and their respective details, and review the result in the playlist. After you’ve created the playlist, select where you wish to go live on Facebook, i.e., desktop or mobile app. On selecting the right option, click the “Go Live” button to conclude the process.

What Products Are Suitable for Facebook Live?
Determining the top-selling product would help retailers to increase sales. Notably, clothing and accessories are the most selling products of 2022 on Facebook. Meanwhile, self-grooming products stand second, followed by furniture and electronic appliances. Provided is a list of the products that seem suitable for Facebook live shopping:
- Electronics
- Home and Garden
- Vehicles
- Clothing and Accessories
- Furniture
- Mobile Accessories
Part 3. Some Progressive Tips To Excel in Facebook Live Shopping
After learning about setting up a Facebook shop, you should look into some tips for settling down in the market. Thus, the following are some strategies that you need to focus on before selling live on Facebook:
1. Promote Your Shopping Event
Build anticipation of your event a couple of days before. Following that, announce or promote your event and encourage people to subscribe to your page. You can invite them via other channels like Instagram posts, blogs, and social media groups.
2. Keep It Short and Engaging
Consider the first few minutes of the live event important. Show an energetic attitude and grab the audience’s attention initially. According to research, social media users prefer to watch videos in under 1 minute.
3. Plan Things and Be Organized
It is better to plan your points of discussion before the event. You should write the outline and transition lines to shift from one product to another. Besides, keep your surroundings organized to give viewers a good impression.
4. Energetically Communicate
Make your audience as much involved in the event as you can. For this, it is suggested that they respond to their questions and ask them to comment. You can show your product trials and ask a friend or family to create more engaging discussions.
5. Don’t Let Your Work Wasted
You should not let your Facebook live online selling sessions be wasted. Save it in your timeline for people to watch anytime and get information about items. It will also attract new audiences who couldn’t join the live session.
Part 4. Sell Better With Simplicity: Wondershare Virbo Live
Live selling on Facebook seems easy, but you need effective tools to attract the most customers. In this regard, people still don’t have enough knowledge to plan and execute live streaming. Therefore, using Wondershare Virbo Live is the ultimate solution to perform the entire process in one place. It is an AI tool that offers multilingual AI-driven avatars for seamless shopping broadcasting.
You can set up a customized Q/A database for automatic queries using this tool. Plus, it is compatible with almost all social media platforms, such as YouTube, Facebook, and Instagram. Not only that, but you can also dive into its prominent features, which are explained below for more insights:
- **AI Live Script Generation:**Are you unable to brainstorm engaging pinpoints for your product selling? Use the AI Script feature of Wondershare Virbo Live and get a compelling script by describing your needs. You can even select a script tone from marketing to specialization options.
- **AI Translation:**To attract a diverse audience, you need videos in different languages. Therefore, Virbo Live offers a feature to translate your script into another language. Apart from that, a dubbing option holds AI voices of different languages and accents.
- **AI Avatars:**If you are a camera-shy person but live selling is a need of your business, use AI Avatars as a dynamic shift to progress. They can mimic real-life nuances while showing various ethnicities and attires. You pick one via scrolling, standing, or sitting pose avatars.
Get Started Online Free Download
Steps To Sell Better With Wondershare Virbo Live
Another notable option is that Wondershare Virbo Live lets you import an image or video background for effective enhancement. To explore that option, follow these steps and use Wondershare Virbo Live to the maximum:
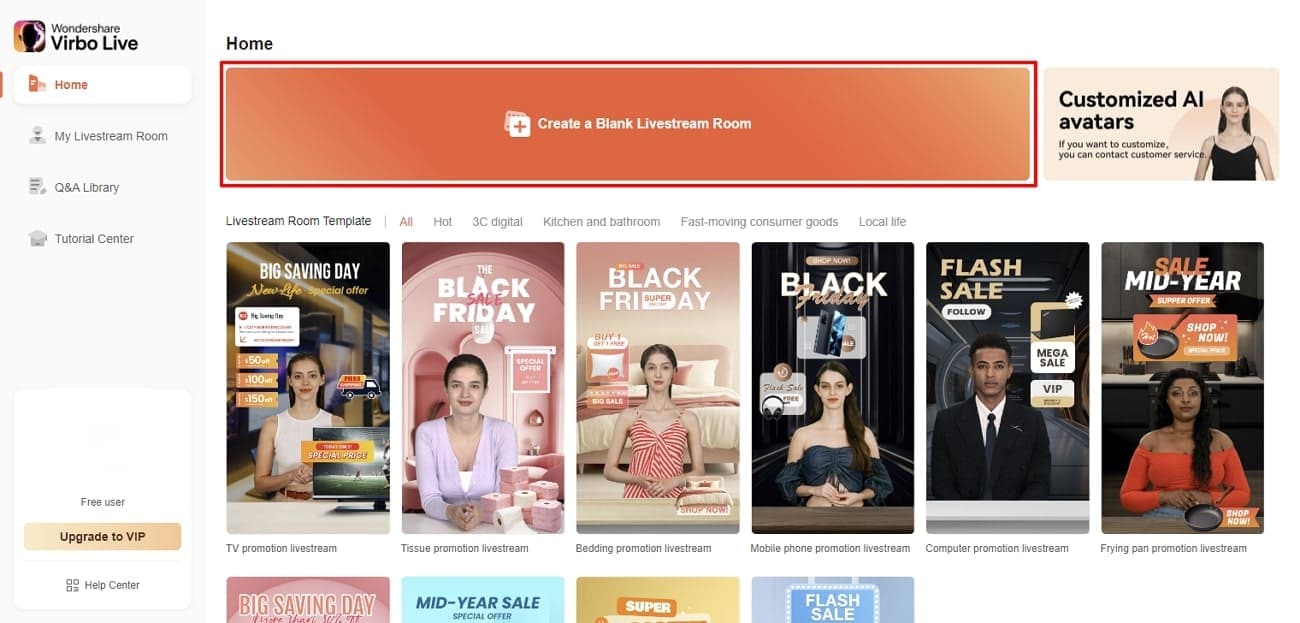
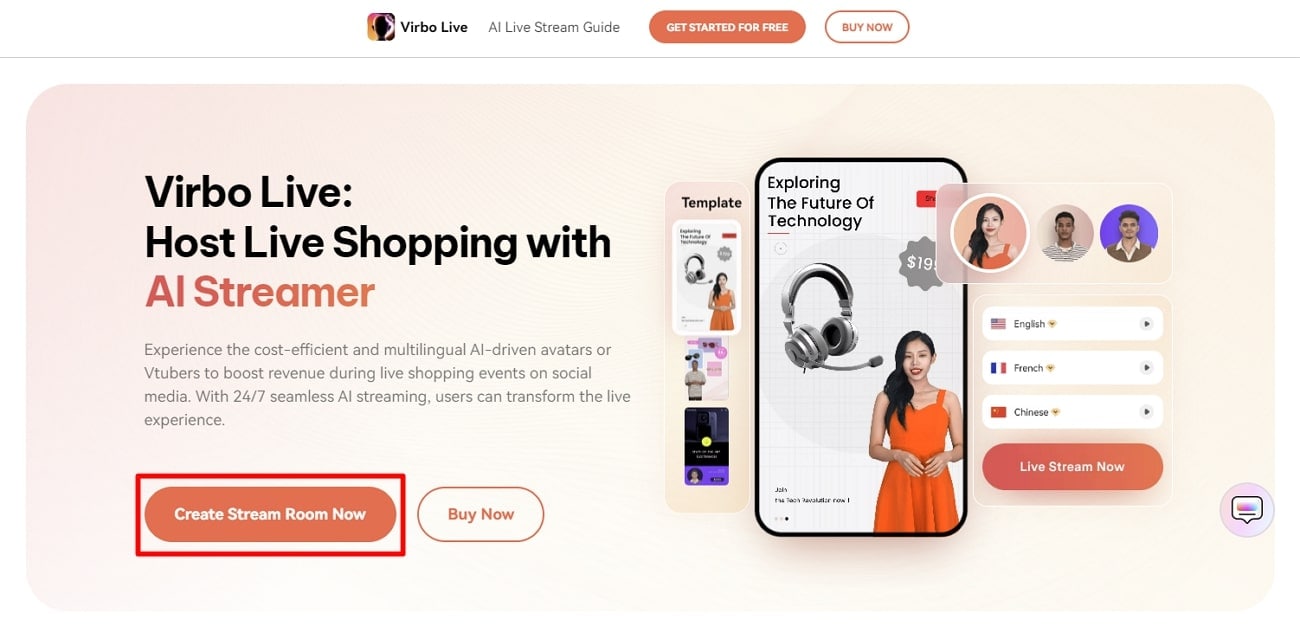
- Step 1. Access Virbo Live and Create a Blank Live Stream Room
Enter the official Virbo Live website and proceed to select the “Create Stream Room Now” button. Select the “Create a Blank Livestream Room” button to initiate the live stream system as you lead into the main interface.
Get Started Online Free Download
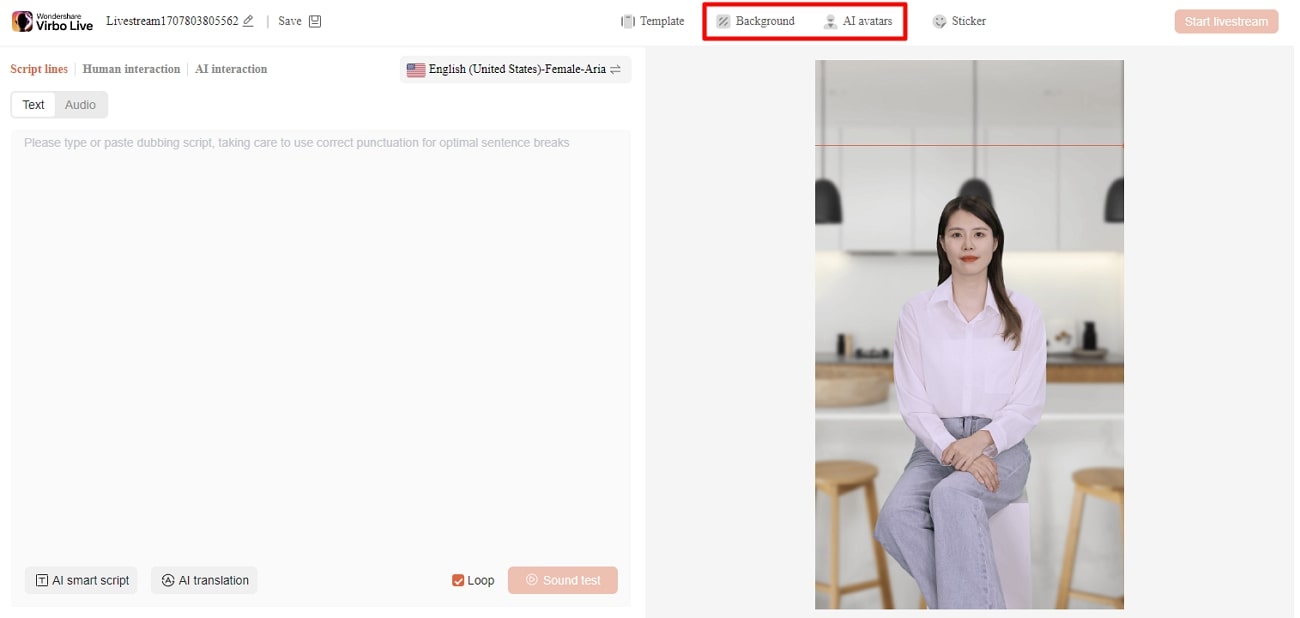
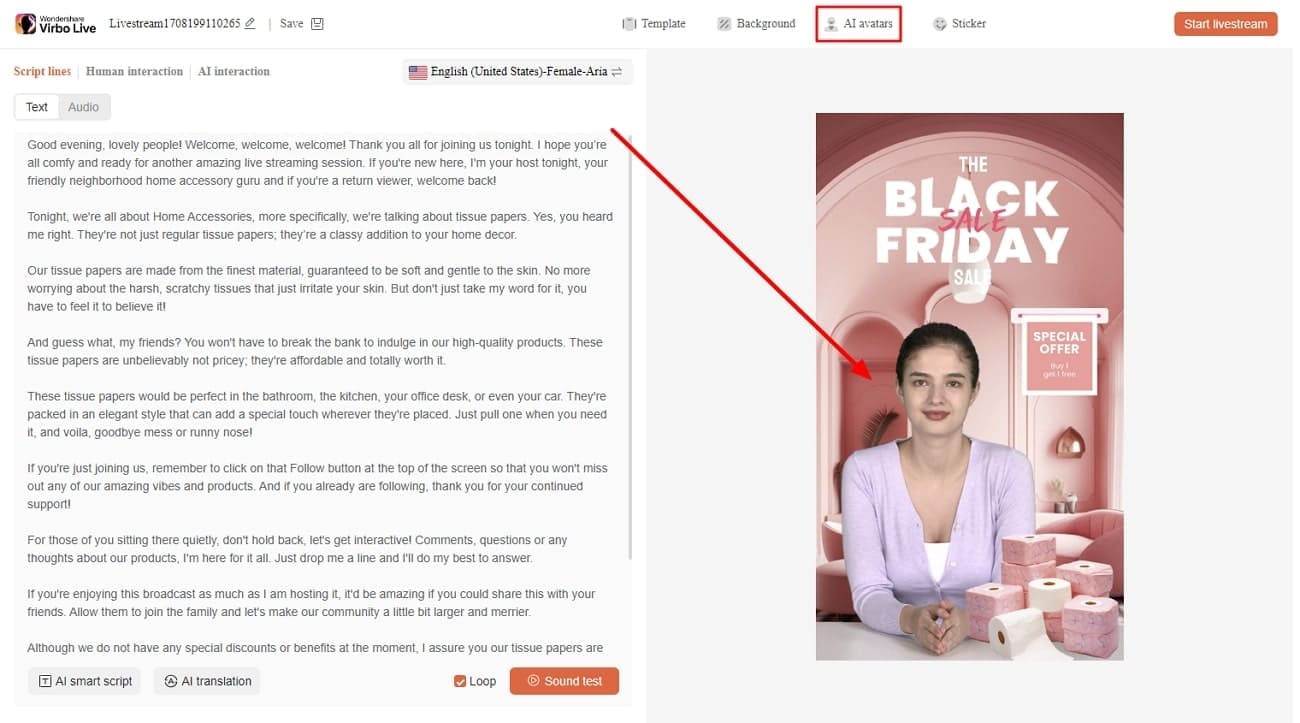
- Step 2. Customize Your AI Avatar for Streaming
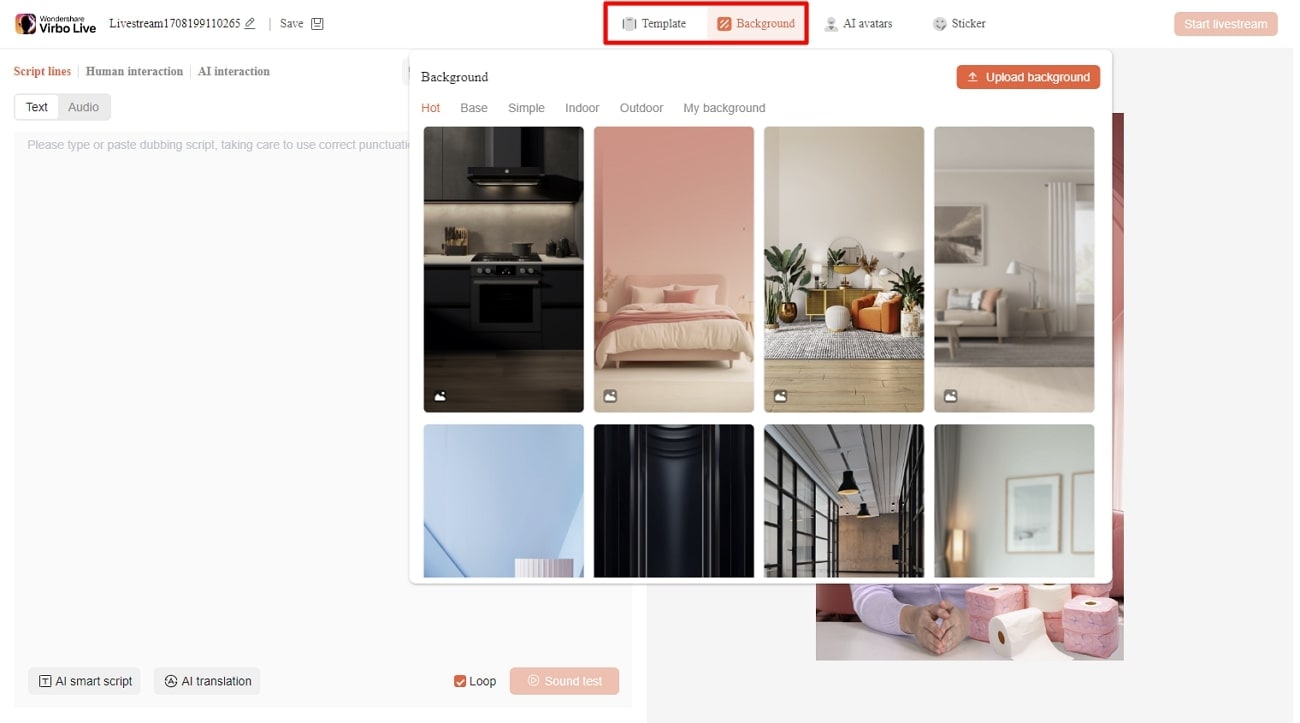
From the editing screen of Virbo Live, press the “AI avatars” option from the top bar. Scroll and pick one avatar that suits you best. Then, hit the “Background” option next to AI Avatar and choose one background.
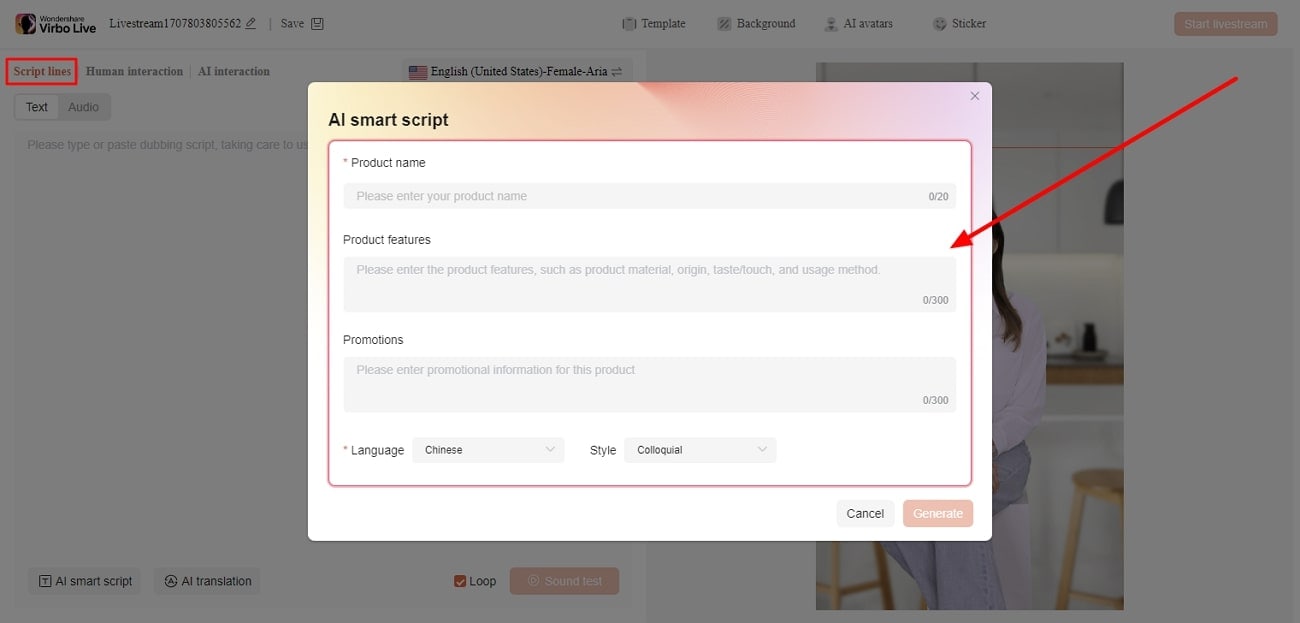
- Step 3. Add Script for Livestream Video
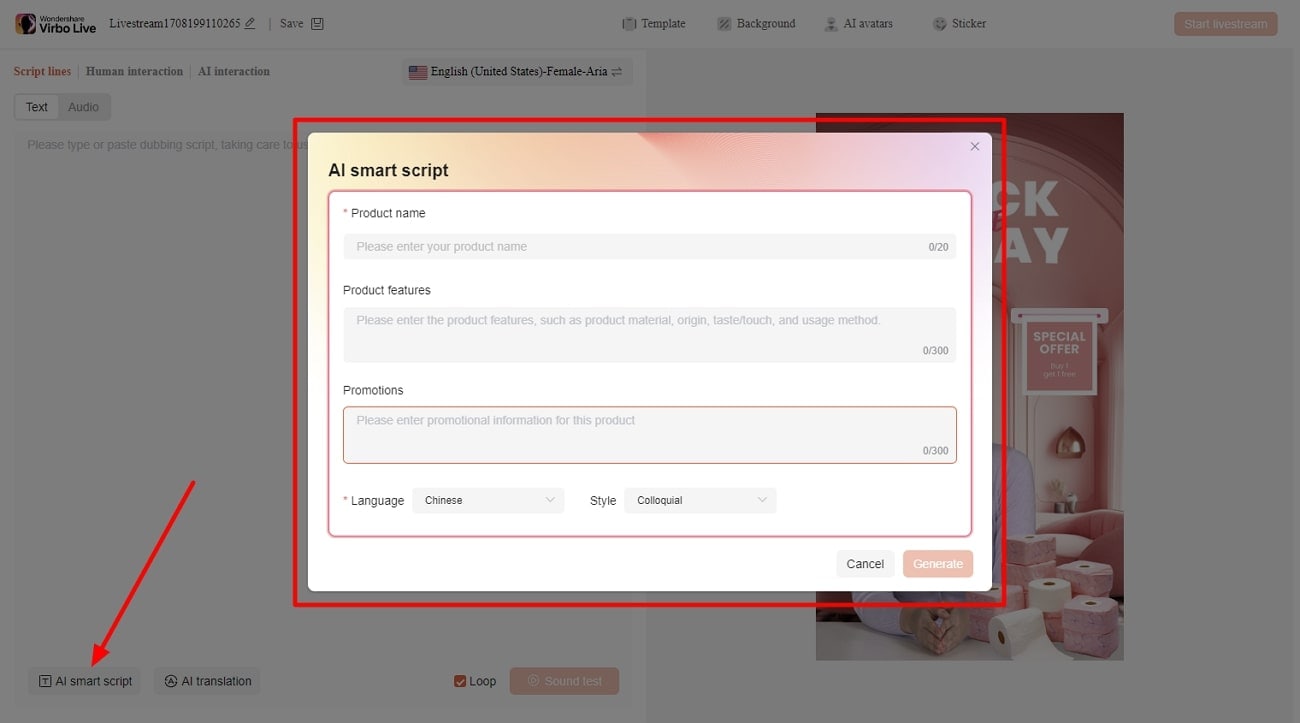
Move to the left and enter the words you want the AI Avatar to speak under the “Script lines” section. Alternatively, you can choose the “AI Smart Script” button from the bottom left corner. You can describe your product, set a Style, and adjust other parameters to get an AI script there.
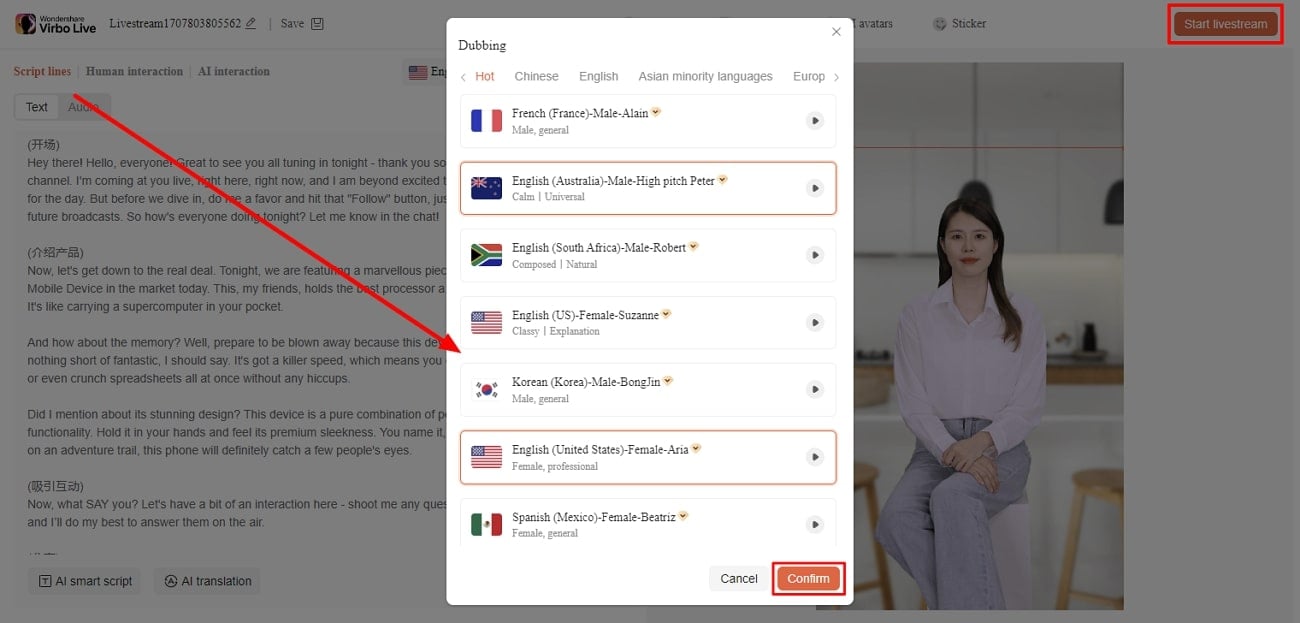
- Step 4. Pick a Dubbing Voice for Avatar To Live Stream
After customizing the avatar, head to the “Dubbing” option from the top. Using it, pick one language and accent of the AI voice to proceed with the “Confirm” button. Finally, your live-selling video is ready to post via the “Start livestream” button at the top right corner.
Conclusion
To summarize, livestream selling is becoming a competition between platforms. Meta isn’t behind in this situation and offers live shopping on Facebook, which is highlighted in this guide. Undoubtedly, Facebook is setting trends, but it is difficult for many users to comprehend. Therefore, Wondershare Virbo Live is a perfect solution to plan and execute live selling seamlessly in one place.
After the COVID-19 pandemic, people started trusting online shopping. Therefore, a live shopping trend emerged, which felt like a one-on-one conversation between shopkeepers and buyers. In this regard, different platforms developed and facilitated live shopping. Yet, many features and options need to be introduced for an evener shopping experience.
Considering this scenario, major tech giants like Meta entered the market. They released a Facebook live shopping feature and pushed the boundaries of e-commerce. If you are new to this tech-based shopping or selling, this guide is for you. However, read it by the end to get comprehensive insights on Facebook live selling and shopping.
Part 1. A Brief Introduction to Facebook Live Shopping
Facebook live shopping is a free tool to interact directly with sellers during a live video. It is among the top livestream shopping platforms in the US, and it was launched in 2021. Retailers connect with buyers while showing their items in real-world scenarios through this service. Facebook lets them tag their product in live streaming, containing website links to place orders.
According to statistics , 82% of consumers prefer livestream content from brands. Besides, 80% of the brands prefer Facebook to market their product through live videos. Still, the e-commerce market continues to develop and address loopholes in live selling with care. Anyhow, look into the perks of Facebook live selling features discussed ahead:
1. Facebook Live Shopping Notification
To bring viewer traffic, Facebook sends notifications to customers. People get notified via Messenger or Facebook notifications about their favorite brand’s live selling. This way, merchants can attract the maximum number of customers.
2. Product Demonstration
Live shopping has completely changed traditional online shopping. Unlike static photos of a product, selling live on Facebooklive shopping allows you to see how the product works. In the live session, potential customers can see how it looks, in which size it is available, and its exact color.
3. Easy Product Management
Before going live, the host can set up a shopping playlist with categories. Also, they can tag product details and website links before going live. As a result, people can easily navigate to the product, add it to their cart, and purchase directly. During the session, anyone can ask questions through the live chat feature.
Part 2. A Beginner’s Guide to Setting Up a Facebook Live Shopping for Your Product
After understanding these features, sellers can set up their shop. For this purpose, review this section and learn to set up your Facebook shop. Below are some details on how to create a shopping profile on Facebook:
Requirements: Firstly, check your business location, which must be based in the USA. Plus, your business can be located in 21 exempt countries in America, Europe, and Asia. Afterward, create a Facebook business page where you carry an admin role. Then, ensure that Facebook supports your country’s currency. Later, verify your product is complying with Facebook’s commerce policies.
- Step 1. Sign in or create a Facebook page containing all information about your brand. Then, go directly to the Meta Business page and hit the “Live” button in the “Create” section.
- Step 2. From the top bar of your Meta Business page, tap the “Live Shopping” option. There, toggle the “Enable Live Shopping” option and go to stream your first shopping session.
Upon creating an account and choosing a suitable product niche, it’s time to feature them. To learn how sellers feature products, review these steps and make your items visible to viewers:
- Step 1. As you enable the live shopping option earlier, click the “Commerce Manager” to discover the Live Shopping feature in the “Promotions” tab. Continue to select the “Create Playlist” button for setting up a product playlist for live shopping.
- Step 2. This opens up a new window where you have to provide all the details involving the product. Add the product and their respective details, and review the result in the playlist. After you’ve created the playlist, select where you wish to go live on Facebook, i.e., desktop or mobile app. On selecting the right option, click the “Go Live” button to conclude the process.
What Products Are Suitable for Facebook Live?
Determining the top-selling product would help retailers to increase sales. Notably, clothing and accessories are the most selling products of 2022 on Facebook. Meanwhile, self-grooming products stand second, followed by furniture and electronic appliances. Provided is a list of the products that seem suitable for Facebook live shopping:
- Electronics
- Home and Garden
- Vehicles
- Clothing and Accessories
- Furniture
- Mobile Accessories
Part 3. Some Progressive Tips To Excel in Facebook Live Shopping
After learning about setting up a Facebook shop, you should look into some tips for settling down in the market. Thus, the following are some strategies that you need to focus on before selling live on Facebook:
1. Promote Your Shopping Event
Build anticipation of your event a couple of days before. Following that, announce or promote your event and encourage people to subscribe to your page. You can invite them via other channels like Instagram posts, blogs, and social media groups.
2. Keep It Short and Engaging
Consider the first few minutes of the live event important. Show an energetic attitude and grab the audience’s attention initially. According to research, social media users prefer to watch videos in under 1 minute.
3. Plan Things and Be Organized
It is better to plan your points of discussion before the event. You should write the outline and transition lines to shift from one product to another. Besides, keep your surroundings organized to give viewers a good impression.
4. Energetically Communicate
Make your audience as much involved in the event as you can. For this, it is suggested that they respond to their questions and ask them to comment. You can show your product trials and ask a friend or family to create more engaging discussions.
5. Don’t Let Your Work Wasted
You should not let your Facebook live online selling sessions be wasted. Save it in your timeline for people to watch anytime and get information about items. It will also attract new audiences who couldn’t join the live session.
Part 4. Sell Better With Simplicity: Wondershare Virbo Live
Live selling on Facebook seems easy, but you need effective tools to attract the most customers. In this regard, people still don’t have enough knowledge to plan and execute live streaming. Therefore, using Wondershare Virbo Live is the ultimate solution to perform the entire process in one place. It is an AI tool that offers multilingual AI-driven avatars for seamless shopping broadcasting.
You can set up a customized Q/A database for automatic queries using this tool. Plus, it is compatible with almost all social media platforms, such as YouTube, Facebook, and Instagram. Not only that, but you can also dive into its prominent features, which are explained below for more insights:
- **AI Live Script Generation:**Are you unable to brainstorm engaging pinpoints for your product selling? Use the AI Script feature of Wondershare Virbo Live and get a compelling script by describing your needs. You can even select a script tone from marketing to specialization options.
- **AI Translation:**To attract a diverse audience, you need videos in different languages. Therefore, Virbo Live offers a feature to translate your script into another language. Apart from that, a dubbing option holds AI voices of different languages and accents.
- **AI Avatars:**If you are a camera-shy person but live selling is a need of your business, use AI Avatars as a dynamic shift to progress. They can mimic real-life nuances while showing various ethnicities and attires. You pick one via scrolling, standing, or sitting pose avatars.
Get Started Online Free Download
Steps To Sell Better With Wondershare Virbo Live
Another notable option is that Wondershare Virbo Live lets you import an image or video background for effective enhancement. To explore that option, follow these steps and use Wondershare Virbo Live to the maximum:
- Step 1. Access Virbo Live and Create a Blank Live Stream Room
Enter the official Virbo Live website and proceed to select the “Create Stream Room Now” button. Select the “Create a Blank Livestream Room” button to initiate the live stream system as you lead into the main interface.
Get Started Online Free Download
- Step 2. Customize Your AI Avatar for Streaming
From the editing screen of Virbo Live, press the “AI avatars” option from the top bar. Scroll and pick one avatar that suits you best. Then, hit the “Background” option next to AI Avatar and choose one background.
- Step 3. Add Script for Livestream Video
Move to the left and enter the words you want the AI Avatar to speak under the “Script lines” section. Alternatively, you can choose the “AI Smart Script” button from the bottom left corner. You can describe your product, set a Style, and adjust other parameters to get an AI script there.
- Step 4. Pick a Dubbing Voice for Avatar To Live Stream
After customizing the avatar, head to the “Dubbing” option from the top. Using it, pick one language and accent of the AI voice to proceed with the “Confirm” button. Finally, your live-selling video is ready to post via the “Start livestream” button at the top right corner.
Conclusion
To summarize, livestream selling is becoming a competition between platforms. Meta isn’t behind in this situation and offers live shopping on Facebook, which is highlighted in this guide. Undoubtedly, Facebook is setting trends, but it is difficult for many users to comprehend. Therefore, Wondershare Virbo Live is a perfect solution to plan and execute live selling seamlessly in one place.
Top 5 Free Streaming Options for Watching MLB Matches
Global sports lovers face many restrictions when watching any region-specific match. These limitations are because major rights are purchased by corresponding regional sports networks. Major League Baseball (MLB) is one of the captivating sports for enthusiasts around the globe. This sport also has restrictions on exclusive broadcasting.
Therefore, finding the best MLB streaming sites is the only hope for viewers worldwide. To make their research easy, this article presents some free MLB streaming sites for fans.

Part 1. Why is MLB Restricted in Different Regions for Users?
TV viewership of MLB games is declining due to geographical restrictions. Local TV channels purchase the broadcasting rights and impose a blackout policy. This policy restricts the game and makes it unavailable in other regions. In this way, blackouts protect the rights of local broadcasters and live-streaming services.
Moreover, the blackout policy varies according to different factors. They include league agreements, regional broadcasting rights, and teams’ home territories. For instance, at least one team is blackout out in every region of the United States. Even some surrounding regions of specific teams also have blackout restrictions. Lowa is the worst blackout out in the USA state, with six teams blacked out.
Due to having limitations, fans are forced to find MLB streaming sites to watch matches. By doing so, they can utilize live stream channels to bypass region-locked restrictions.
Part 2. Find the Best Free MLB Streaming Sites for Watching Your Favorite Matches
Millions of worldwide MLB fans love to watch every match. Meanwhile, the irritating regional restrictions frustrate them. So, they have to find the best streaming platform for gaming. To help out their ventures, we have enlisted here the five best free MLB streaming sites.
1. MLB Webcast
When you’re struggling to watch Major League Baseball games, MLB Webcast is the primary solution. This efficient game-streaming site allows free access to all MLB live streams. You can watch your favorite matches with no buffering or lag. Interestingly, the adaptive bitrate of the platform delivers high-quality video and audio for the best watching experience.

Key Features
- There are no geo-restrictions, so fans from anywhere can watch MLB matches.
- You can find multiple commentary options and choose the best one according to your preference.
- With MLB Webcast, viewers can access live streams on all devices, including phones and laptops.
2. Stream2Watch
Stream2Watch is another top-notch platform that provides MLB streaming services. You can enjoy live events and access a library of highlights through this platform. Moreover, viewers can watch expert analysis and behind-the-scene videos for better insights. Amazingly, this platform supports all devices like smartphones, laptops, tablets, or TVs.

Key Features
- You can access the latest news about MLB matches, players, teams, and coaches.
- Stream2Watch offers HD streaming with the latest technology to double the fun for viewers.
- This platform provides a seamless viewing experience regardless of your current location.
3. MLB66
With its intuitive options, MLB66 provides a dedicated platform for MLB fans. They can enjoy the live chatting feature while watching live matches. Moreover, users can customize device settings according to requirements. Apart from that, you can enable or disable auto-play and live chat functions.

Key Features
- Viewers can change the layout and theme for a better viewing experience.
- A built-in betting simulator helps improve betting skills for free with virtual money.
- MLB66’s Stats & History section shows betting predictions and ranking history.
4. Fubo TV
Fubo is an innovative sports streaming site that supports all devices for watching MLB matches. Most importantly, you can watch live streams anytime and anywhere without restrictions. Moreover, this platform allows you to experience a trial for free. Once you purchase a plan, you can cancel the contract anytime.

Key Features
- This platform provides cloud DVR to record games for up to 1000 hours.
- Fubo allows you to access live TV streams from 200+ renowned channels.
- Along with MLB streams, this streaming service lets you watch MLS, MMA, and NBA.
5. Sportsurge
Watching MLB matches with Sportsurge doubles the fun for sports lovers. This platform presents a dedicated section to experience HD live MLB streams. You don’t even need to look into your pocket to pay a heavy subscription price, as it is completely free. Overall, this is one of the best sports streaming sites to watch all popular sports like MLB, NBA, and Football.

Key Features
- Sportsurge provides an easy way to check upcoming MLB matches.
- This platform has a user-centric interface to facilitate users with intuitive live streaming options.
- No region-based restrictions exist, so you want to watch sports from anywhere.
Part 3. Comparison of the Best MLB Streaming Sites [Made Easy]
As a matter of fact, every tool provides benefits with some drawbacks as well. In the above section, we have included the five best MLB streaming sites. These sites also offer both perks and negatives. So, here is a clear comparison of the sites to help you pick the best one.
| Features | MLB Webcast | Stream2Watch | MLB66 | Fubo | Sportsurge |
|---|---|---|---|---|---|
| MLB Live Streaming | ✓ | ✓ | ✓ | ✓ | ✓ |
| Geographic-Restrictions | No | No | No | Available in US territories only | No |
| Ad-Free Experience | X | X | X | ✓ | X |
| Live Chat Feature | X | X | ✓ | X | X |
| HD Streaming | Yes | Yes | Yes | Yes | Yes |
After going through all these points, you have a clear idea about each platform. You can easily choose the best streaming platform for gaming and sports matches.
Bonus Part. Make Personalized Live Stream Videos Using Wondershare Virbo Live
Streaming live content has become a productive technique for different sectors. Streamers use various streaming tools to create all types of content. So, whether you want to livestream for marketing or display casual content, you need the right tool to engage the audience. For this purpose, Wondershare Virbo Live is the best live-streaming tool for sports or other such streams.
This tool provides a wide range of AI-powered features to level up your live-streaming game. You can translate text into multiple languages and use different accents for global reach. In addition, it is compatible with seamless cloud-based service. Plus, you can see automatic responses to engage more of the audience in real time.
Top-Rated Functions of Wondershare Virbo Live
- With the Wondershare Virbo Live tool, you can choose creative AI avatars and Vtubers for your live game streams. They have various poses, attire, and ethnicities.
- Moreover, it has an advanced AI smart script feature that enables you to generate scripts. You just need to write a command and let it create scripts according to your needs.
- Users can generate dubbing of content into multiple languages with AI Streamer. Also, they can try different AI voices.
Easy Guide To Create a Streaming Room Using Wondershare Virbo Live
Virbo Live lets you start virtual streams instantly with AI-integrated functions. Following are the steps to create your streaming room in Virbo Live.
- Step 1. Open the Website and Navigate To Create Stream Room
Begin with opening the official website of Virbo Live to find the streaming options. Scroll down and hit the “Create Stream Room Now” button. After choosing the option, it takes you inside the main editing display of the tool.

- Step 2. Choose an Appropriate Livestream Room Template
On the interface, choose a well-suited livestream room template for your live event. Once you click on a template, the tool opens the next window and shows you the selected template on the right side.

- Step 3. Customize Livestream Template With Exciting Options
Then, you can drag objects or text given on the template to change their positions. Also, you can customize their sizes according to your marketing or content streaming needs. Besides, click on the “Background” to apply different backgrounds. Then, choose the “AI avatars” tab to select elegant avatars. Additionally, you can also add stickers to your livestream.

- Step 4. Move To Script Lines To Get Dubbed Audio
Next, click on the “Script Lines” tab at the top left corner. Choose the “Audio” option on the same screen. After that, hit the “Upload Local Voice” button to upload your local voice audio. Then, select the language and accent. Considering your selections, it generates AI-dubbed audio within a few seconds.

- Step 5. Start Your Personalized Live Stream
Once you complete all the customizations, you can start your live stream. At the window’s top right corner, hit the “Start livestream” button to initiate your live stream.

Conclusion
Watching MLB matches is always fun for viewers, but it becomes hectic when facing region-based restrictions. To overcome those limitations, this article introduces free MLB streaming sites. With these platforms, you can watch all the matches on any device from anywhere. Besides, we have introduced you to Virbo Live, which can assist you in creating your live streams with different AI functions.
After going through all these points, you have a clear idea about each platform. You can easily choose the best streaming platform for gaming and sports matches.
Bonus Part. Make Personalized Live Stream Videos Using Wondershare Virbo Live
Streaming live content has become a productive technique for different sectors. Streamers use various streaming tools to create all types of content. So, whether you want to livestream for marketing or display casual content, you need the right tool to engage the audience. For this purpose, Wondershare Virbo Live is the best live-streaming tool for sports or other such streams.
This tool provides a wide range of AI-powered features to level up your live-streaming game. You can translate text into multiple languages and use different accents for global reach. In addition, it is compatible with seamless cloud-based service. Plus, you can see automatic responses to engage more of the audience in real time.
Top-Rated Functions of Wondershare Virbo Live
- With the Wondershare Virbo Live tool, you can choose creative AI avatars and Vtubers for your live game streams. They have various poses, attire, and ethnicities.
- Moreover, it has an advanced AI smart script feature that enables you to generate scripts. You just need to write a command and let it create scripts according to your needs.
- Users can generate dubbing of content into multiple languages with AI Streamer. Also, they can try different AI voices.
Easy Guide To Create a Streaming Room Using Wondershare Virbo Live
Virbo Live lets you start virtual streams instantly with AI-integrated functions. Following are the steps to create your streaming room in Virbo Live.
- Step 1. Open the Website and Navigate To Create Stream Room
Begin with opening the official website of Virbo Live to find the streaming options. Scroll down and hit the “Create Stream Room Now” button. After choosing the option, it takes you inside the main editing display of the tool.
- Step 2. Choose an Appropriate Livestream Room Template
On the interface, choose a well-suited livestream room template for your live event. Once you click on a template, the tool opens the next window and shows you the selected template on the right side.
- Step 3. Customize Livestream Template With Exciting Options
Then, you can drag objects or text given on the template to change their positions. Also, you can customize their sizes according to your marketing or content streaming needs. Besides, click on the “Background” to apply different backgrounds. Then, choose the “AI avatars” tab to select elegant avatars. Additionally, you can also add stickers to your livestream.
- Step 4. Move To Script Lines To Get Dubbed Audio
Next, click on the “Script Lines” tab at the top left corner. Choose the “Audio” option on the same screen. After that, hit the “Upload Local Voice” button to upload your local voice audio. Then, select the language and accent. Considering your selections, it generates AI-dubbed audio within a few seconds.
- Step 5. Start Your Personalized Live Stream
Once you complete all the customizations, you can start your live stream. At the window’s top right corner, hit the “Start livestream” button to initiate your live stream.
Conclusion
Watching MLB matches is always fun for viewers, but it becomes hectic when facing region-based restrictions. To overcome those limitations, this article introduces free MLB streaming sites. With these platforms, you can watch all the matches on any device from anywhere. Besides, we have introduced you to Virbo Live, which can assist you in creating your live streams with different AI functions.
A Detailed Guide To Stream to Instagram With an RTMP
Professionals and content creators now use different social media platforms for live streaming. There are many big names on these platforms, such as Instagram . Instagram is one of the most-used networks, with over 2 billion monthly active users. Using this live-stream platform is always a plus for companies and individuals.
However, the discussion is about how to stream to Instagram with an RTMP. This detailed guide helps you in using RTMP Instagram for live streaming. Furthermore, you will also learn about a recommended tool that offers AI-powered features for broadcasting.
Part 1. Some Rules and Requirements To Understand Before Live Streaming on Instagram
Like every platform, Instagram has some protocols for broadcasting content to global audiences. Therefore, learning the rules and requirements before going live on Instagram is necessary. First, your account should be at least 30 days old; otherwise, they can restrict your stream.
There is a rule that you can go live for 4 hours per stream without retakes. This length was increased from 60 minutes in the recent update. Also, you can repost a live video on your profile if it is more than 15 minutes long. Instagram allows you to schedule a stream from 1 hour to 90 days in advance.
The initial requirement of Instagram Live RTMP is that your content be respectful and updated. Additionally, you need to set your stream to 1920x1080 resolution on a vertical camera. Meanwhile, Instagram gives leverage on the number of followers so that you can start with minimum viewers. Also, there is no need to have a business account for live streaming.
Part 2. How To Live Stream to Instagram With an RTMP?
Setting high-quality live streams encourages people to tune into your broadcast. For this purpose, you need a seamless encoder like OBS . Unfortunately, Instagram doesn’t officially support third-party encoders. To solve this query, you need an effective solution.
Therefore, the following steps guide streaming on Instagram with an RTMP (Real-Time Messaging Protocol). You will also learn how to set the required parameters in this comprehensive guide:
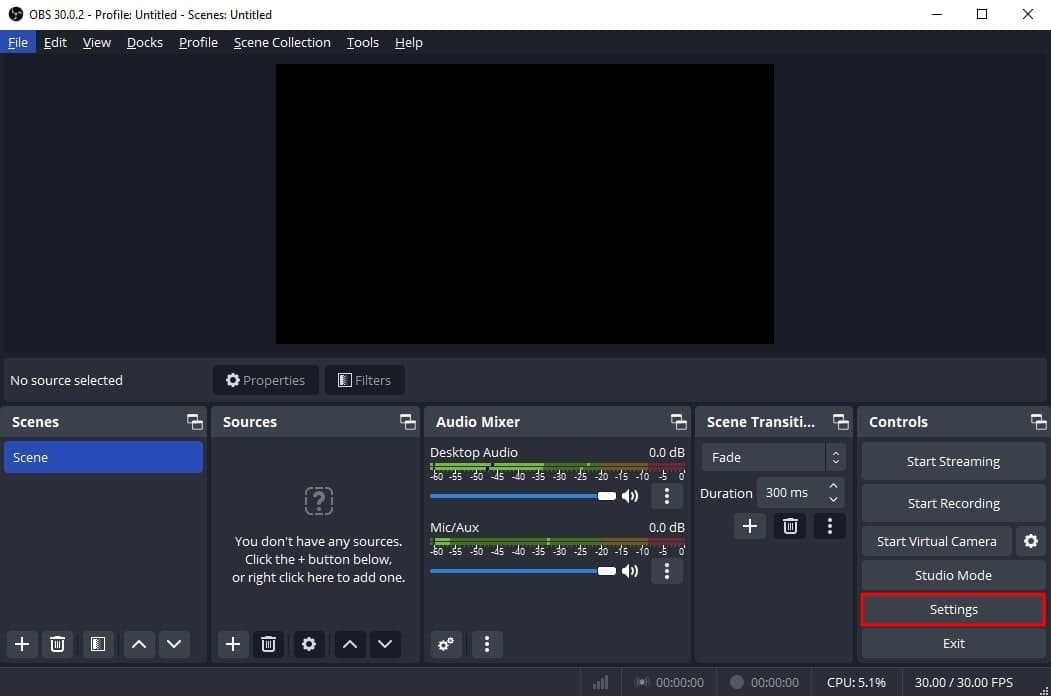
- Step 1. Start with downloading and launching OBS Studio on your PC. The first thing to do is set up vertical camera dimensions for RTMP Instagram live streaming. To access the settings window, hit the “Settings” option in the “Controls” panel.
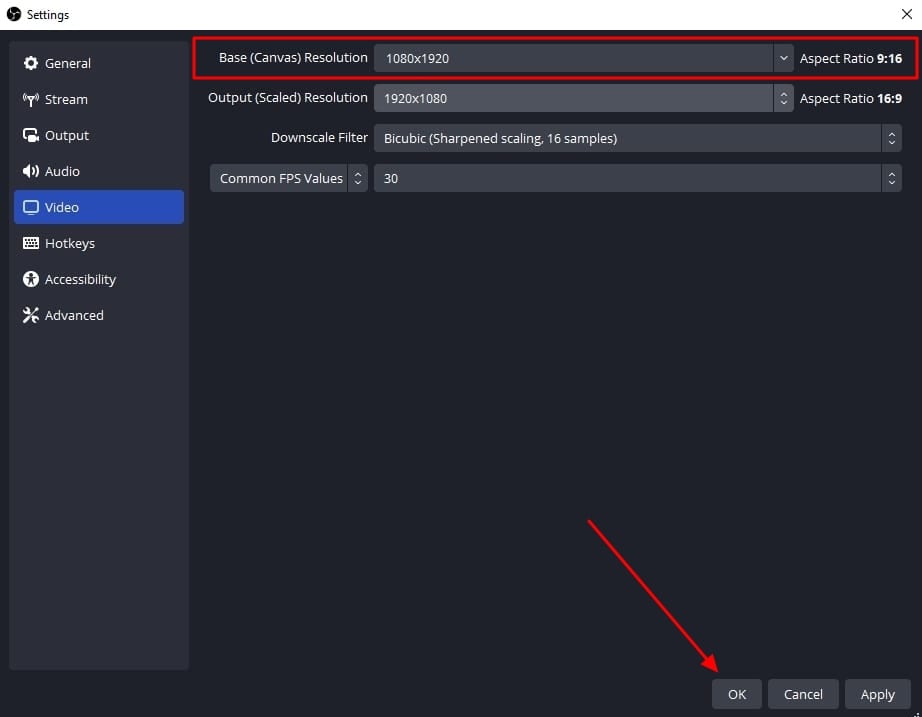
- Step 2. Look for the “Video” tab in the “Settings” window that opens. After that, enter “1080x1920” in the “Base (Canvas) Resolution” bar. Similarly, add a “1080x1920” value in the “Output (Scaled) Resolution” bar to set a 9:16 aspect ratio for vertical display. Then, hit the “OK” button to apply these changes to your Instagram streams.
- Step 3. After that, you need to add external sources to the scene. Click on the “+” icon in the “Scenes” panel or rename the scene. Once the scene is created, hit the “+” icon of the “Sources” panel. Then, select the “Video Capture Device” option from the menu and rename the device to your liking. After that, choose the video capture device from the “Device” dropdown and hit the “OK” option. Similarly, you can select the “Audio Input Capture” option to introduce an audio device.

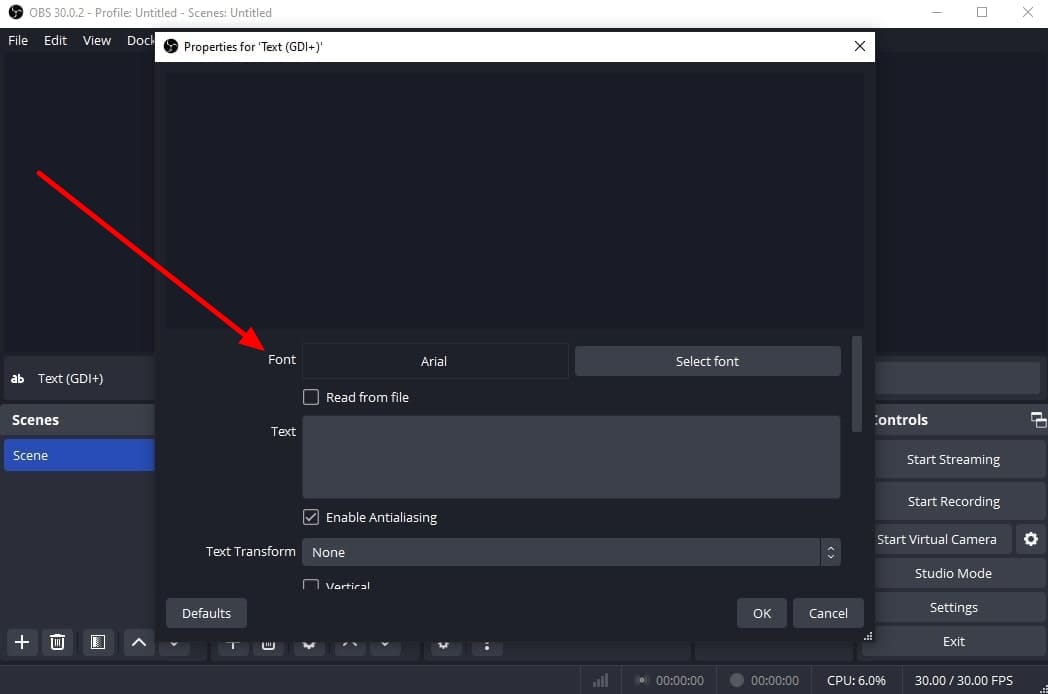
- Step 4. To add text overlays on your stream, hit the “+” icon again in the “Sources” panel. Choose the “Text (GDI+)” option and rename your overlay. On the next window, insert your text in the “Text” box. Then, click the “Select Font” button and choose your required font style and size. Additionally, you can change font color, opacity, alignment, background, and more. After customizing the text, hit the “OK” button to save the overlay in the sources section.
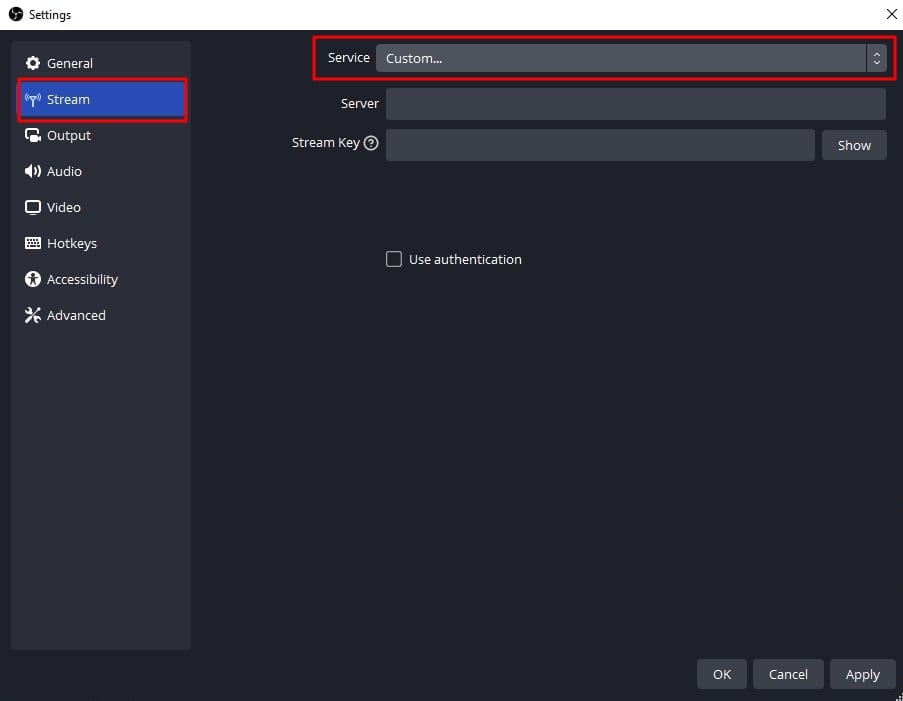
- Step 5. Afterward, select the “Stream” option in the settings window of OBS Studio. Set the “Service” to “Custom” from the dropdown. Then, you need to enter the server and stream key to proceed.
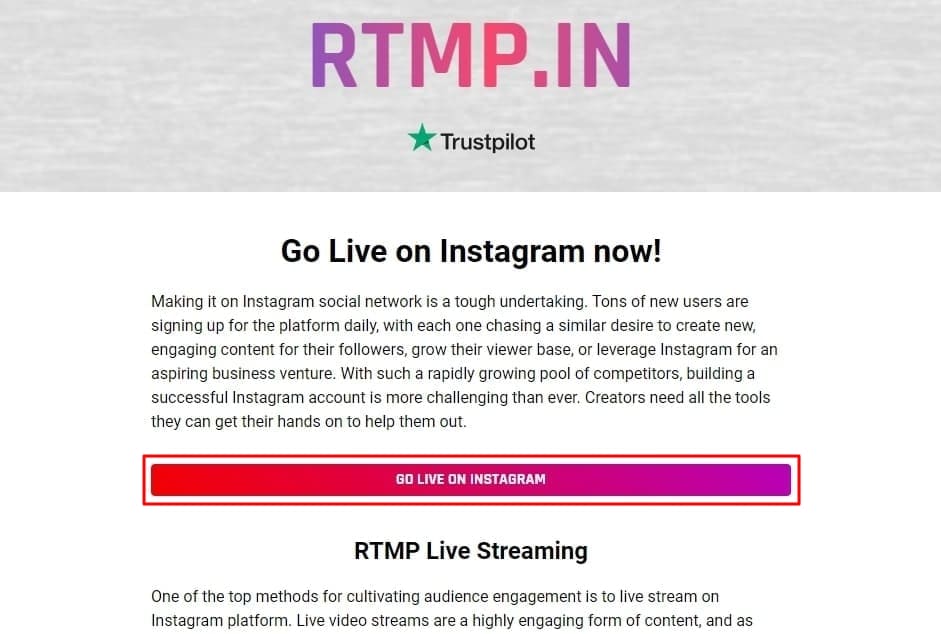
- Step 6. To get the server and stream key, visit rtmp.in on your browser. On the main interface of this Instagram RTMP, hit the “GO LIVE ON INSTAGRAM” widget. Then, it asks you to log in to your Instagram account.
- Step 7. Once you’re logged in, it gives you a stream server URL and Stream key. First, copy the Server link and return to the OBS Studio software. Then, paste the link in the “Server” bar. After that, open the RTMP site again and hit the “Create New Broadcast” option.
You can also give a name to your broadcast in the “Broadcast Title” bar. After creating the broadcast, it shows the “Stream Key,” which you can copy. Then, move again to the OBS Stream setting panel and paste the key in the “Stream Key” bar. Lastly, hit the “Apply” option to save all these settings for your stream.

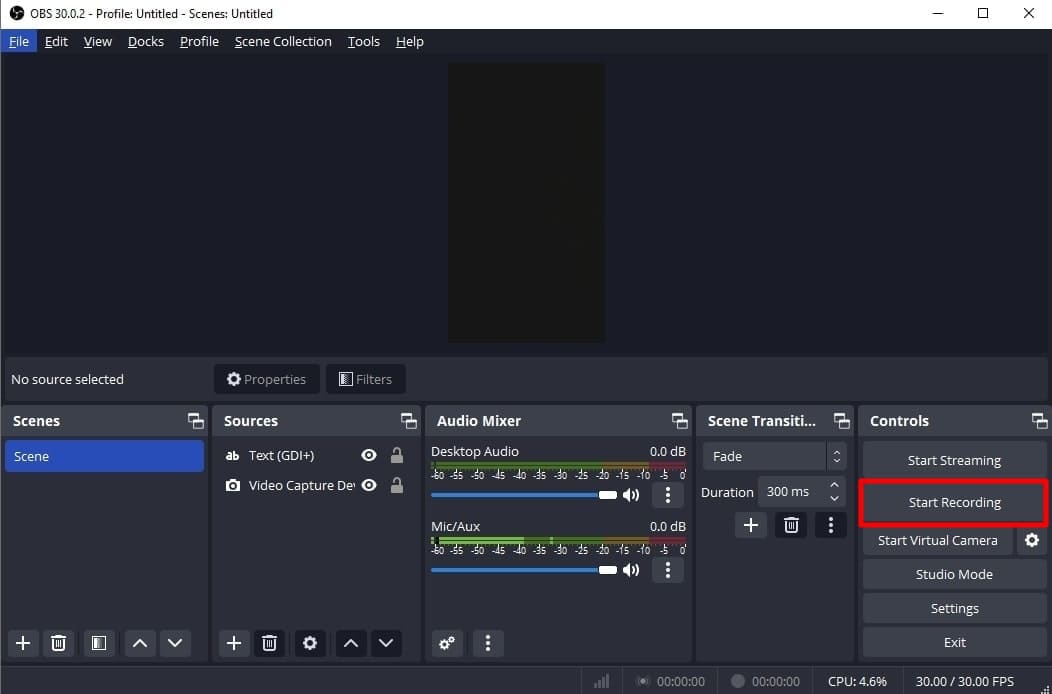
- Step 8. After getting ready, choose the “Start Streaming” option from the “Controls” panel. It starts your stream with selected parameters. To stop the stream, you can select the “Stop Streaming” option.
Part 3. How To Attract a Better Audience During Live Streaming on Instagram?
OBS Studio is an efficient software but offers limited functionality when it comes to engaging streams. Thus, you need an advanced solution that can help you reach global audiences through live streaming. For this purpose, Wondershare Virbo Live becomes an unsung hero for you. It provides AI-powered functions that help to start creative streams and generate more leads.
Moreover, the handy controls of Wondershare Virbo Live allow you to customize live streams to your requirements. Therefore, you can start streaming for different purposes, such as marketing, brand awareness, and more. Additionally, it allows you to set automatic responses and create a Q&A database to keep your audience engaged. Plus, it allows you to select creative AI avatars with different poses and outfits.
Key Features of Virbo Live
- You can choose different templates and backgrounds for a stunning streaming appearance.
- Users can write or generate scripts manually using the AI Smart Script feature. For this, they need to add prompts according to the script’s purpose.
- This tool helps to translate scripts into multiple languages and accents. Also, you can get dubbed audio in different AI voices.
Simple Guide To Start Live Streaming Using Wondershare Virbo Live
Many live streaming tools exist, but Wondershare Virbo Live provides more controls. Now, the thing is how to create a live stream room with this tool. For this, follow the given steps one by one to start live streaming with Virbo Live:
- Step 1. Visit the Official Site To Create a Stream Room
First,open theofficial website of Wondershare Virbo Live tool on your device. Navigate to the window and hit the “Create Stream Room Now” button. Upon doing that, it takes you inside the main interface of the tool.
Get Started Online Free Download
- Step 2. Advance To Create a Blank Livestream Room
Once you get to the tool’s home screen, select the “Create a Blank Livestream Room” option. Then, you can try different customization features to make your livestream room look stunning.

- Step 3. Customize Your Livestream Template and Background
After that, click on the “Template” tab to explore different templates. Choose a template that suits live streaming needs. Furthermore, open the “Background” tab from the same window to check exciting background options. You can select different backgrounds from variating categories in the same window.
- Step 4. Add Script or Use AI Script Generator
Then, you need to provide the script for translation or dubbing. Select the “Text” given in the left side section for this. It provides a text box to type or paste your script text. Choose the “AI Smart Script” option from the bottom left corner if you don’t have a script. Add prompts there, and it will generate your scripts instantly.
- Step 5. Select Creative AI Avatars According to Requirement
Select the “AI avatars” tab to unveil creative avatars. There is also a whole range of AI avatars to choose from. After selecting the one that suits your motive, you can preview your selected AI avatar before launching the stream.
- Step 6. Start Your Livestream With All Selections
After finalizing all the options, you canproceed to start your stream. Select the “Start livestream” option from the top right corner in the same window.
Conclusion
Conclusively, this article intends to provide information about rules and requirements for live streaming on Instagram. You also learned how to live stream to Instagram with an RTMP like OBS Studio. Tools like Wondershare Virbo Live simplify your live streams with AI integration. Also, you can make your broadcast exciting for viewers by using different interactive elements.
Professionals and content creators now use different social media platforms for live streaming. There are many big names on these platforms, such as Instagram . Instagram is one of the most-used networks, with over 2 billion monthly active users. Using this live-stream platform is always a plus for companies and individuals.
However, the discussion is about how to stream to Instagram with an RTMP. This detailed guide helps you in using RTMP Instagram for live streaming. Furthermore, you will also learn about a recommended tool that offers AI-powered features for broadcasting.
Part 1. Some Rules and Requirements To Understand Before Live Streaming on Instagram
Like every platform, Instagram has some protocols for broadcasting content to global audiences. Therefore, learning the rules and requirements before going live on Instagram is necessary. First, your account should be at least 30 days old; otherwise, they can restrict your stream.
There is a rule that you can go live for 4 hours per stream without retakes. This length was increased from 60 minutes in the recent update. Also, you can repost a live video on your profile if it is more than 15 minutes long. Instagram allows you to schedule a stream from 1 hour to 90 days in advance.
The initial requirement of Instagram Live RTMP is that your content be respectful and updated. Additionally, you need to set your stream to 1920x1080 resolution on a vertical camera. Meanwhile, Instagram gives leverage on the number of followers so that you can start with minimum viewers. Also, there is no need to have a business account for live streaming.
Part 2. How To Live Stream to Instagram With an RTMP?
Setting high-quality live streams encourages people to tune into your broadcast. For this purpose, you need a seamless encoder like OBS . Unfortunately, Instagram doesn’t officially support third-party encoders. To solve this query, you need an effective solution.
Therefore, the following steps guide streaming on Instagram with an RTMP (Real-Time Messaging Protocol). You will also learn how to set the required parameters in this comprehensive guide:
- Step 1. Start with downloading and launching OBS Studio on your PC. The first thing to do is set up vertical camera dimensions for RTMP Instagram live streaming. To access the settings window, hit the “Settings” option in the “Controls” panel.
- Step 2. Look for the “Video” tab in the “Settings” window that opens. After that, enter “1080x1920” in the “Base (Canvas) Resolution” bar. Similarly, add a “1080x1920” value in the “Output (Scaled) Resolution” bar to set a 9:16 aspect ratio for vertical display. Then, hit the “OK” button to apply these changes to your Instagram streams.
- Step 3. After that, you need to add external sources to the scene. Click on the “+” icon in the “Scenes” panel or rename the scene. Once the scene is created, hit the “+” icon of the “Sources” panel. Then, select the “Video Capture Device” option from the menu and rename the device to your liking. After that, choose the video capture device from the “Device” dropdown and hit the “OK” option. Similarly, you can select the “Audio Input Capture” option to introduce an audio device.
- Step 4. To add text overlays on your stream, hit the “+” icon again in the “Sources” panel. Choose the “Text (GDI+)” option and rename your overlay. On the next window, insert your text in the “Text” box. Then, click the “Select Font” button and choose your required font style and size. Additionally, you can change font color, opacity, alignment, background, and more. After customizing the text, hit the “OK” button to save the overlay in the sources section.
- Step 5. Afterward, select the “Stream” option in the settings window of OBS Studio. Set the “Service” to “Custom” from the dropdown. Then, you need to enter the server and stream key to proceed.
- Step 6. To get the server and stream key, visit rtmp.in on your browser. On the main interface of this Instagram RTMP, hit the “GO LIVE ON INSTAGRAM” widget. Then, it asks you to log in to your Instagram account.
- Step 7. Once you’re logged in, it gives you a stream server URL and Stream key. First, copy the Server link and return to the OBS Studio software. Then, paste the link in the “Server” bar. After that, open the RTMP site again and hit the “Create New Broadcast” option.
You can also give a name to your broadcast in the “Broadcast Title” bar. After creating the broadcast, it shows the “Stream Key,” which you can copy. Then, move again to the OBS Stream setting panel and paste the key in the “Stream Key” bar. Lastly, hit the “Apply” option to save all these settings for your stream.
- Step 8. After getting ready, choose the “Start Streaming” option from the “Controls” panel. It starts your stream with selected parameters. To stop the stream, you can select the “Stop Streaming” option.
Part 3. How To Attract a Better Audience During Live Streaming on Instagram?
OBS Studio is an efficient software but offers limited functionality when it comes to engaging streams. Thus, you need an advanced solution that can help you reach global audiences through live streaming. For this purpose, Wondershare Virbo Live becomes an unsung hero for you. It provides AI-powered functions that help to start creative streams and generate more leads.
Moreover, the handy controls of Wondershare Virbo Live allow you to customize live streams to your requirements. Therefore, you can start streaming for different purposes, such as marketing, brand awareness, and more. Additionally, it allows you to set automatic responses and create a Q&A database to keep your audience engaged. Plus, it allows you to select creative AI avatars with different poses and outfits.
Key Features of Virbo Live
- You can choose different templates and backgrounds for a stunning streaming appearance.
- Users can write or generate scripts manually using the AI Smart Script feature. For this, they need to add prompts according to the script’s purpose.
- This tool helps to translate scripts into multiple languages and accents. Also, you can get dubbed audio in different AI voices.
Simple Guide To Start Live Streaming Using Wondershare Virbo Live
Many live streaming tools exist, but Wondershare Virbo Live provides more controls. Now, the thing is how to create a live stream room with this tool. For this, follow the given steps one by one to start live streaming with Virbo Live:
- Step 1. Visit the Official Site To Create a Stream Room
First,open theofficial website of Wondershare Virbo Live tool on your device. Navigate to the window and hit the “Create Stream Room Now” button. Upon doing that, it takes you inside the main interface of the tool.
Get Started Online Free Download
- Step 2. Advance To Create a Blank Livestream Room
Once you get to the tool’s home screen, select the “Create a Blank Livestream Room” option. Then, you can try different customization features to make your livestream room look stunning.
- Step 3. Customize Your Livestream Template and Background
After that, click on the “Template” tab to explore different templates. Choose a template that suits live streaming needs. Furthermore, open the “Background” tab from the same window to check exciting background options. You can select different backgrounds from variating categories in the same window.
- Step 4. Add Script or Use AI Script Generator
Then, you need to provide the script for translation or dubbing. Select the “Text” given in the left side section for this. It provides a text box to type or paste your script text. Choose the “AI Smart Script” option from the bottom left corner if you don’t have a script. Add prompts there, and it will generate your scripts instantly.
- Step 5. Select Creative AI Avatars According to Requirement
Select the “AI avatars” tab to unveil creative avatars. There is also a whole range of AI avatars to choose from. After selecting the one that suits your motive, you can preview your selected AI avatar before launching the stream.
- Step 6. Start Your Livestream With All Selections
After finalizing all the options, you canproceed to start your stream. Select the “Start livestream” option from the top right corner in the same window.
Conclusion
Conclusively, this article intends to provide information about rules and requirements for live streaming on Instagram. You also learned how to live stream to Instagram with an RTMP like OBS Studio. Tools like Wondershare Virbo Live simplify your live streams with AI integration. Also, you can make your broadcast exciting for viewers by using different interactive elements.
Live Chat With WooCommerce: Leading Into the Live Selling World
E-commerce has reached an unprecedented level of fame all around the world. It provides convenience for buying and selling goods through accessible platforms. WooCommerce is one of those leading platforms that offer a satisfying e-commerce experience. Also, this platform is well-known for its exceptional functionality and infrastructure, which makes online selling easy.
What if you want a WooCommerce live chat feature to interact with your customers? This article presents benefits and ways to integrate live chat with WooCommerce to interact with customers. You can also learn about an innovative live-streaming platform that boosts your live sales.

Part 1. Overviewing WooCommerce E-Commerce and Its Utility in the Market
WooCommerce is a powerful e-commerce platform renowned for its adaptability. Its scalable nature allows you to start businesses of all sizes. The advanced customization options of WooCommerce make things effortless for users. Moreover, it provides a flexible selling experience, whether you’re selling products or services. Irrespective of its functionality, the live chat WooCommerce feature is absent from the platform.
People can use WooCommerce as a plugin for WordPress, the leading content management system. This open-source plugin helps users customize their online stores. By doing so, it allows sellers to meet their branding requirements. Also, you can manage inventory, order processing, payment gateways, and shipping details. Moreover, it provides a built-in geo-location support to detect customer’s address.

Features of WooCommerce
Many businesses are using WooCommerce for online stores throughout the world. Its impressive usability and accessibility help users in different e-commerce aspects. Provided are some features of WooCommerce that make it special for brand owners:
1. Inventory Management
It provides multiple inventory management options to track stock levels. You can receive notifications for short or out-of-stock products. Moreover, you can sort or filter products by price, popularity, ratings, latest, and more.
2. Pre-installed Payment Methods
To simplify payment processes, WooCommerce provides pre-installed payment gateways. You can choose any payment method, including Cash on Delivery, PayPal, and Credit Card payments.
3. Sell Anything
With WooCommerce, you can sell anything from real products to digital downloads. Moreover, this 100% open-source plugin allows you to sell anywhere with its global support.
4. Mobile Friendliness
WooCommerce ensures that your store looks equally beautiful on desktop and smartphone. Store owners can even turn their existing stores into mobile apps without custom coding.
Part 2. How To Add Live Chat Feature in WooCommerce?
Live chatting is an essential function for interacting with the audience for trustworthiness. Unfortunately, WooCommerce doesn’t provide a dedicated live chat feature. If you want to use this service, integrate it separately with a third-party source. For this purpose, you can use a reliable plugin that enables WooCommerce online chat.
LiveChat is a renowned customer service platform that provides a superb live experience. It helps to chat with customers and share their data with CRM. Moreover, the AI chatbots help to greet your store visitors with automated responses. They allow you to capture more leads and increase sales. Ultimately, LiveChat helps boost your store’s overall revenue.
Comprehensive Guide to Setting Up the LiveChat Plugin on WooCommerce
Using the LiveChat plugin is a good option to get alive chat for WooCommerce. The query is how to set up the plugin across your WooCommerce store. For this, the provided step-by-step resolves all queries involving setting up the LiveChat plugin:
- Step 1. First, you have to access the WordPress dashboard to enter the “Plugins” section. Then, hit the “Add New” button and write “LiveChat WooCommerce” to search for this plugin. Look for the “WordPress Live Chat Plugin for WooCommerce – LiveChat” in the results that appear. Once identified, click the “Install Now” button to proceed.

- Step 2. Upon installation, you need to hit the “Activate” widget. After that, sign up with your account on the “Integrate with LiveChat” screen.

- Step 3. When the log-in and installation process is complete, a chat widget appears on the website. Then, click on “Go to LiveChat” to start live chatting.

- Step 4. If you want to change the settings, select the “LiveChat” option in the WordPress dashboard. Next, hit “Settings” and turn on or turn off the desired options.

Part 3. Wondershare Virbo Live: Assisting Quality Livestream Selling
Live selling has set marketing expectations high for the sellers. Therefore, you should use an efficient live selling tool to stay competitive. To meet the standards, Wondershare Virbo Live is an intuitive and interactive live streaming tool to enhance your streaming quality. Most sellers don’t have the knowledge to market their items on WooCommerce. For this purpose, this simple and easy-to-use medium will help sellers grow revenue.
Moreover, this tool is compatible with all major social media platforms. This allows you to integrate live streams with YouTube, Facebook, Instagram, and more. You don’t need to download the platform as it supports cloud-based service. Another exciting feature is that you can introduce AI avatars or VTubers to your live sessions. Overall, this is the best live-streaming platform with AI-powered features.
Key Highlights of Wondershare Virbo Live
- The smart AI streamer allows you to translate text for dubbing into different languages. It helps accommodate a wider audience of different regions, ethnicities, and cultures.
- Wondershare Virbo Live helps create scripts for live selling. Its built-in AI Smart Script feature allows you to type or generate a script with instant prompts.
- Users can also change live stream templates and backgrounds. Moreover, it allows the addition of creative stickers for better customer engagement.
Get Started Online Free Download
Step-by-Step Guide to Creating a Streaming Room in Virbo Live
Many live-streaming tools exist, but Wondershare Virbo Live is the most recommended. It provides innovative AI-powered functions to facilitate users in a single platform. Here’s how you can create your streaming room using this tool:
- Step 1. Generate a Blank Live Streaming Room
Access the Virbo Live tool from its official website. You must select the “Create Stream Room Now” button from the display. On the new screen, navigate and select the “Create a Black Livestream Room” option. Upon doing so, you will get access to several live-streaming settings.

Get Started Online Free Download
- Step 2. Integrate Microphone for Human-Like Interaction
Now, press the “Human interaction” tab on the left of your screen to integrate the mic with this tool. You have to hit the “Turn Microphone on to Take Over” button under the “Microphone” sub-section. Also, you can move to the “AI Interaction” tab to create an automated Q&A session.

- Step 3. Customize Live Stream Template and Background
Wondershare Virbo Live presents different templates and backgrounds for users. Click on the “Background” tab from the top navigation bar to try stunning backgrounds. You can also select the “Template” tab to explore various templates for quick live streaming setup.

- Step 5. Pick Suitable AI Avatars for Your Live Event
To add more fun, hit the “AI Avatars” tab from the top navigation bar. This section shows creative avatars with different outfits and poses. You can choose the suitable one that demonstrates your personality. After selecting the avatar, you can preview it on the right side of the screen.

- Step 6. Start Your Livestream After All Settings
After customizing all the features according to your desire, click on the “Start livestream” button at the top right of the screen. The results will be displayed across the respective selection as you decide which platform you’ll be using for the livestream.

Part 4. Discussion: Why Should We Shift To Live Selling?
Live chatting services add more energy to your live events. As discussed, the WooCommerce online chat feature is essential to engage with potential customers. Some people still feel doubtful about whether they will get benefits or not. This section clarifies some potential benefits of shifting to live selling that users can get in the overall market:
- **Build Connections:**Live streams add a human touch in the live selling that connects viewers emotionally. So you can easily build relationships to increase your brand awareness.
- **Successful Selling:**People can understand what to expect from a product during the live stream. So, it results in successful live selling and reduced delivery returns.
- **Global Audience:**Unlike traditional selling strategies, live selling helps reach international audiences. You can showcase products or services from anywhere to gain worldwide customers.
- **Digital Experience:**Live selling is far ahead of the offline world. For this digital experience, shoppers don’t need to find reliable physical stores. Also, the digitalized live shopping experience is more entertaining and profitable.
Conclusion
This ultimate guide provides an overview of WooCommerce and its features. We have also explained a way to enable WooCommerce live chat. Moreover, we have introduced a live-streaming tool that can integrate with other social platforms. With Virbo Live, users can optimize their streams with features like AI avatars, script generation, and much more.
E-commerce has reached an unprecedented level of fame all around the world. It provides convenience for buying and selling goods through accessible platforms. WooCommerce is one of those leading platforms that offer a satisfying e-commerce experience. Also, this platform is well-known for its exceptional functionality and infrastructure, which makes online selling easy.
What if you want a WooCommerce live chat feature to interact with your customers? This article presents benefits and ways to integrate live chat with WooCommerce to interact with customers. You can also learn about an innovative live-streaming platform that boosts your live sales.
Part 1. Overviewing WooCommerce E-Commerce and Its Utility in the Market
WooCommerce is a powerful e-commerce platform renowned for its adaptability. Its scalable nature allows you to start businesses of all sizes. The advanced customization options of WooCommerce make things effortless for users. Moreover, it provides a flexible selling experience, whether you’re selling products or services. Irrespective of its functionality, the live chat WooCommerce feature is absent from the platform.
People can use WooCommerce as a plugin for WordPress, the leading content management system. This open-source plugin helps users customize their online stores. By doing so, it allows sellers to meet their branding requirements. Also, you can manage inventory, order processing, payment gateways, and shipping details. Moreover, it provides a built-in geo-location support to detect customer’s address.
Features of WooCommerce
Many businesses are using WooCommerce for online stores throughout the world. Its impressive usability and accessibility help users in different e-commerce aspects. Provided are some features of WooCommerce that make it special for brand owners:
1. Inventory Management
It provides multiple inventory management options to track stock levels. You can receive notifications for short or out-of-stock products. Moreover, you can sort or filter products by price, popularity, ratings, latest, and more.
2. Pre-installed Payment Methods
To simplify payment processes, WooCommerce provides pre-installed payment gateways. You can choose any payment method, including Cash on Delivery, PayPal, and Credit Card payments.
3. Sell Anything
With WooCommerce, you can sell anything from real products to digital downloads. Moreover, this 100% open-source plugin allows you to sell anywhere with its global support.
4. Mobile Friendliness
WooCommerce ensures that your store looks equally beautiful on desktop and smartphone. Store owners can even turn their existing stores into mobile apps without custom coding.
Part 2. How To Add Live Chat Feature in WooCommerce?
Live chatting is an essential function for interacting with the audience for trustworthiness. Unfortunately, WooCommerce doesn’t provide a dedicated live chat feature. If you want to use this service, integrate it separately with a third-party source. For this purpose, you can use a reliable plugin that enables WooCommerce online chat.
LiveChat is a renowned customer service platform that provides a superb live experience. It helps to chat with customers and share their data with CRM. Moreover, the AI chatbots help to greet your store visitors with automated responses. They allow you to capture more leads and increase sales. Ultimately, LiveChat helps boost your store’s overall revenue.
Comprehensive Guide to Setting Up the LiveChat Plugin on WooCommerce
Using the LiveChat plugin is a good option to get alive chat for WooCommerce. The query is how to set up the plugin across your WooCommerce store. For this, the provided step-by-step resolves all queries involving setting up the LiveChat plugin:
- Step 1. First, you have to access the WordPress dashboard to enter the “Plugins” section. Then, hit the “Add New” button and write “LiveChat WooCommerce” to search for this plugin. Look for the “WordPress Live Chat Plugin for WooCommerce – LiveChat” in the results that appear. Once identified, click the “Install Now” button to proceed.
- Step 2. Upon installation, you need to hit the “Activate” widget. After that, sign up with your account on the “Integrate with LiveChat” screen.
- Step 3. When the log-in and installation process is complete, a chat widget appears on the website. Then, click on “Go to LiveChat” to start live chatting.
- Step 4. If you want to change the settings, select the “LiveChat” option in the WordPress dashboard. Next, hit “Settings” and turn on or turn off the desired options.
Part 3. Wondershare Virbo Live: Assisting Quality Livestream Selling
Live selling has set marketing expectations high for the sellers. Therefore, you should use an efficient live selling tool to stay competitive. To meet the standards, Wondershare Virbo Live is an intuitive and interactive live streaming tool to enhance your streaming quality. Most sellers don’t have the knowledge to market their items on WooCommerce. For this purpose, this simple and easy-to-use medium will help sellers grow revenue.
Moreover, this tool is compatible with all major social media platforms. This allows you to integrate live streams with YouTube, Facebook, Instagram, and more. You don’t need to download the platform as it supports cloud-based service. Another exciting feature is that you can introduce AI avatars or VTubers to your live sessions. Overall, this is the best live-streaming platform with AI-powered features.
Key Highlights of Wondershare Virbo Live
- The smart AI streamer allows you to translate text for dubbing into different languages. It helps accommodate a wider audience of different regions, ethnicities, and cultures.
- Wondershare Virbo Live helps create scripts for live selling. Its built-in AI Smart Script feature allows you to type or generate a script with instant prompts.
- Users can also change live stream templates and backgrounds. Moreover, it allows the addition of creative stickers for better customer engagement.
Get Started Online Free Download
Step-by-Step Guide to Creating a Streaming Room in Virbo Live
Many live-streaming tools exist, but Wondershare Virbo Live is the most recommended. It provides innovative AI-powered functions to facilitate users in a single platform. Here’s how you can create your streaming room using this tool:
- Step 1. Generate a Blank Live Streaming Room
Access the Virbo Live tool from its official website. You must select the “Create Stream Room Now” button from the display. On the new screen, navigate and select the “Create a Black Livestream Room” option. Upon doing so, you will get access to several live-streaming settings.
Get Started Online Free Download
- Step 2. Integrate Microphone for Human-Like Interaction
Now, press the “Human interaction” tab on the left of your screen to integrate the mic with this tool. You have to hit the “Turn Microphone on to Take Over” button under the “Microphone” sub-section. Also, you can move to the “AI Interaction” tab to create an automated Q&A session.
- Step 3. Customize Live Stream Template and Background
Wondershare Virbo Live presents different templates and backgrounds for users. Click on the “Background” tab from the top navigation bar to try stunning backgrounds. You can also select the “Template” tab to explore various templates for quick live streaming setup.
- Step 5. Pick Suitable AI Avatars for Your Live Event
To add more fun, hit the “AI Avatars” tab from the top navigation bar. This section shows creative avatars with different outfits and poses. You can choose the suitable one that demonstrates your personality. After selecting the avatar, you can preview it on the right side of the screen.
- Step 6. Start Your Livestream After All Settings
After customizing all the features according to your desire, click on the “Start livestream” button at the top right of the screen. The results will be displayed across the respective selection as you decide which platform you’ll be using for the livestream.
Part 4. Discussion: Why Should We Shift To Live Selling?
Live chatting services add more energy to your live events. As discussed, the WooCommerce online chat feature is essential to engage with potential customers. Some people still feel doubtful about whether they will get benefits or not. This section clarifies some potential benefits of shifting to live selling that users can get in the overall market:
- **Build Connections:**Live streams add a human touch in the live selling that connects viewers emotionally. So you can easily build relationships to increase your brand awareness.
- **Successful Selling:**People can understand what to expect from a product during the live stream. So, it results in successful live selling and reduced delivery returns.
- **Global Audience:**Unlike traditional selling strategies, live selling helps reach international audiences. You can showcase products or services from anywhere to gain worldwide customers.
- **Digital Experience:**Live selling is far ahead of the offline world. For this digital experience, shoppers don’t need to find reliable physical stores. Also, the digitalized live shopping experience is more entertaining and profitable.
Conclusion
This ultimate guide provides an overview of WooCommerce and its features. We have also explained a way to enable WooCommerce live chat. Moreover, we have introduced a live-streaming tool that can integrate with other social platforms. With Virbo Live, users can optimize their streams with features like AI avatars, script generation, and much more.
Perfect Guide To Excel in TikTok Live Shopping
Various social media platforms are helping businesses to elevate live shopping industry trends. TikTok is one of them and has become an integral part of content creators’ lives. Besides producing content, many professionals use TikTok for its selling ecosystem. It even allows people to adapt new online advertising techniques through live-stream events.
In this article, you will get insights about the working algorithm and rules of TikTok livestream shopping. You will also explore an advanced live-streaming platform. Moreover, you can learn some practical tips here to stand out as a leading seller on TikTok.
Part 1. What Is TikTok Live Shopping and How Does It Operate?
**TikTok Live Shopping is an innovative online advertising strategy introduced by TikTok in 2021. This feature has integrated live streaming into the e-commerce environment. Brands can showcase their products through real-time events. Unlike traditional marketing tactics, it helps to engage with customers directly for a global reach. Other than that, brands can advertise with engaging in-feed videos on TikTok to increase sales.
Shoppers can discover and purchase products and checkout directly within TikTok. They can also explore new brands by tapping the shop icon and checking the items recommended by the TikTok community. According to legitimate statistics , 67% of users say that TikTok marketing inspires them to buy something when they don’t even think about it.
How Does TikTok Live Shopping Operates?
Marketers can operate TikTok Live selling through live streaming and e-commerce. For this process, sellers start live streams and demonstrate their products or services. After going live, they can pin specific items to make them appear on screen for buyers. Also, they can schedule a live stream to get more time for preparation and promotion.
When shoppers interact with them, they can buy directly within the app by providing links or buttons. So, there is no need to go out of the platform and surf other websites. Moreover, they can make transactions through integrated payment gateways. Then, sellers ensure fulfillment and smooth delivery of the produce.
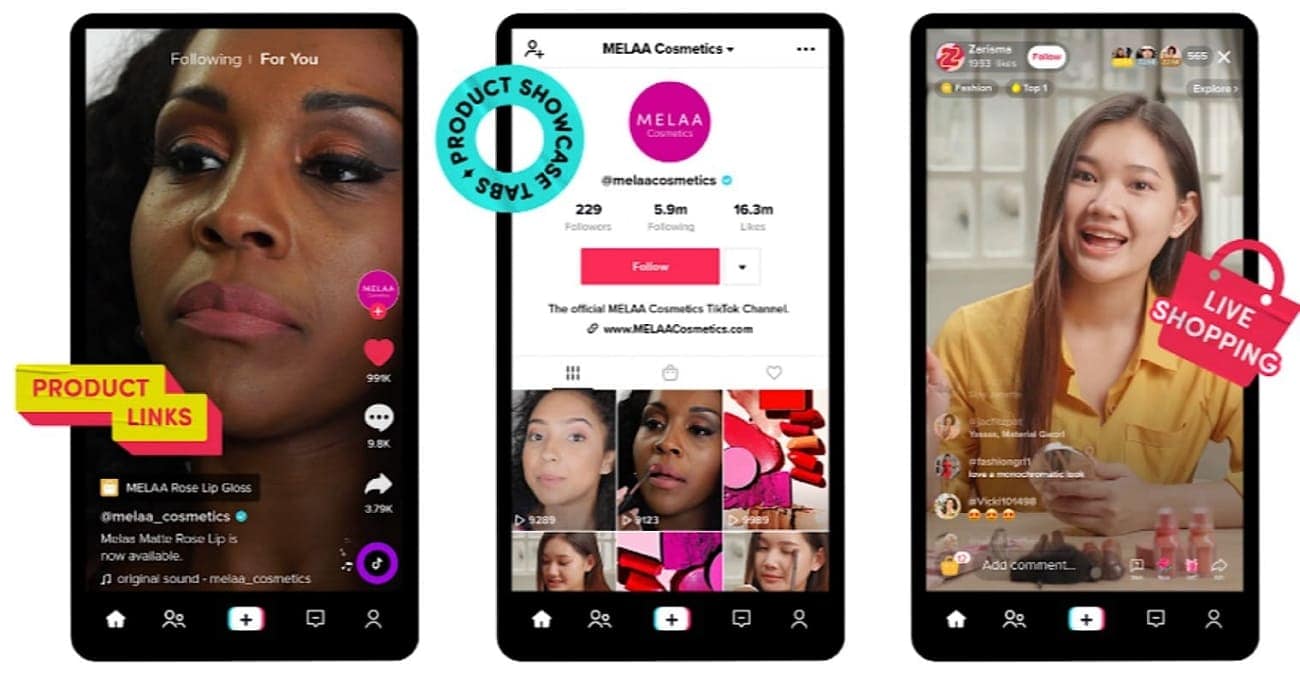
Why Is TikTok Live Shopping Beneficial in the Current Digital Industry?
TikTok is the fastest-evolving network, with over one billion users worldwide. Therefore, it is attractive for brands to advertise products and grow their profile. The following are some major benefits of the TikTok Live shopping experience:
- Global Reach: An extensive user base makes TikTok more beneficial for professionals. They can go live from anywhere and showcase their products or services to find potential customers.
- Sales Boost: Sellers can provide discounts or offers to shoppers during live stream to increase their sales. A report shows that 40% of Gen Z TikTok users have purchased at least one product while watching live-streaming content.
- Real-Time Interaction: The TikTok algorithm lets sellers connect with audiences in real time. It even helps build trustworthy customer relationships that increase sales over time.
- Engaging Platform: TikTok has cemented its position as one of the top-most engaging platforms. It provides exceptional broadcast features and controls. About 18% of marketers and brands use TikTok for marketing and live shopping events.
Part 2. Rules To Obey While Using TikTok Live Selling Feature
Like every social media platform, TikTok has some requirements to use the live session feature. For this, you need to be at least 18 years old and have a minimum of 1000 followers. Besides, there are some rules to obey while using TikTok live. According to TikTok’s community guidelines , your content should be respectful and updated. Also, it should not address deceptive terms or violate human life.
How To Go Live on TikTok for Live Selling?
After knowing the requirements and rules, the query is how to do TikTok live selling through livestream. For this purpose, follow the simple steps to go live with your TikTok account.
Step 1. Launch the TikTok app and tap on the “+” icon at the bottom-center of the app display. It takes you into the video creation mode, and there, you slide the bottom menu bar to select the “LIVE” option.
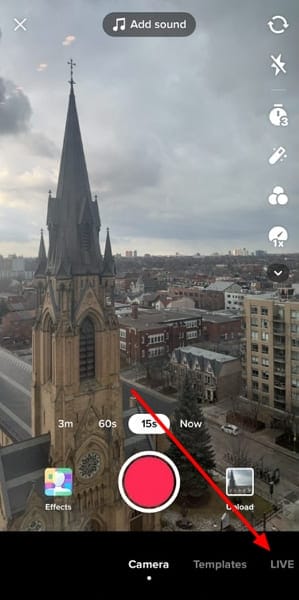
Step 2. After that, tap “Add a Title” to write a creative title for the livestream within 32 characters. Lastly, hit the “Go Live” button to initiate your live streaming.
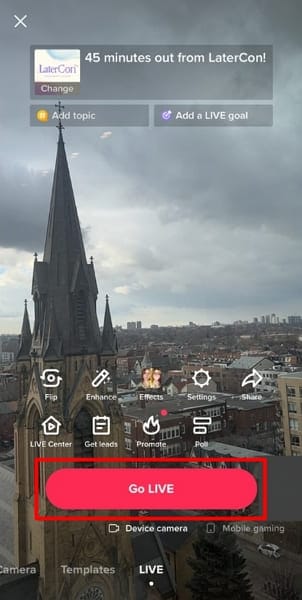
How To Schedule a Live Shopping Event on TikTok?
Apart from going live simply, TikTok allows you to schedule live shopping events to get more time for preparation. Here’s how to schedule a TikTok livestream shopping event step by step.
Step 1. First, open the TikTok app and tap the “Calendar” icon at the top-right corner. Proceed to select “Create an event” on the continuing page. It then asks you to enter “Event Name” of a maximum of 32 characters and “Start Time” to set the event duration.
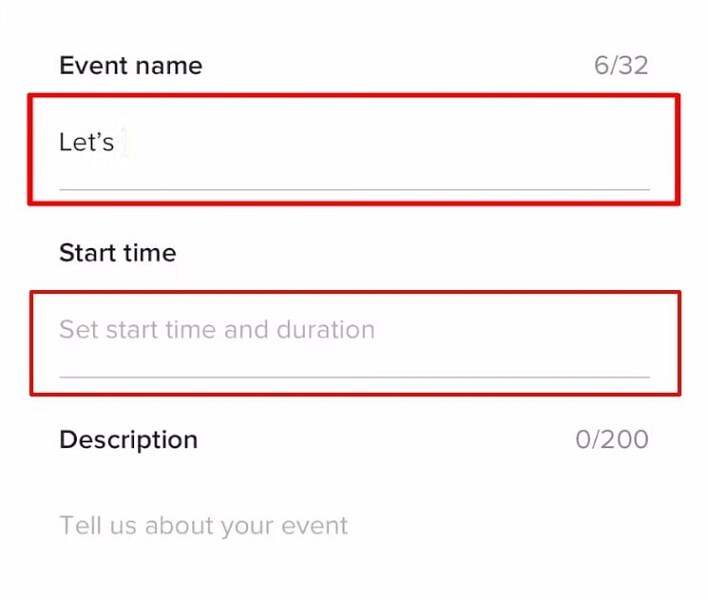
Step 2. Afterward, write a “Description” of the event to define it within 200 characters. Lastly, tap on “Create,” and your event will go under review for approval. Once your live shopping TikTok event gets approved, you can see it on your profile.
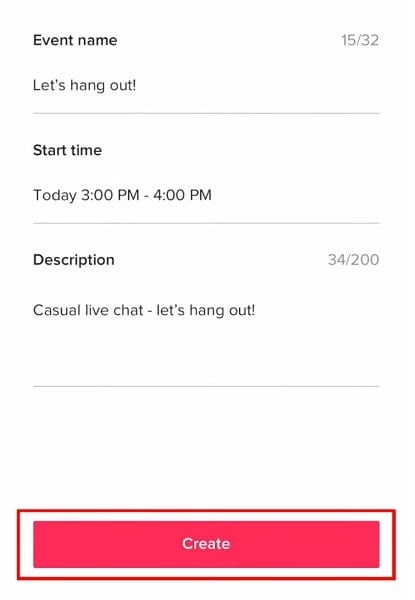
Part 3. Tips That Can Make You the Next Big Seller on TikTok Live Shopping
Many platforms are out there for selling on TikTok Live, and the competition is touching the sky. Therefore, you have to take smart steps to survive in the live shopping ecosystem. To help you become the next big seller on TikTok live shopping**,** we have discussed some simple tips here:
Tip 1. Using Wondershare Virbo Live To Make Engaging Livestreaming Content
For effective live selling, you need an efficient live-streaming platform. At the moment, Wondershare Virbo Live stands out as the best platform to host result-oriented live shopping events on social media. It helps you counter the language barriers with AI integration of multiple accents and languages.
It allows you to generate creative scripts for live shopping to save time and effort. Moreover, the built-in AI system helps you translate text and generate AI voice. So, you can reach a global audience to allow them to experience live shopping. It enables you to interact with the audience smartly through automatic responses. You can also set up a personal Q&A database for prompt responses.
Important Characteristics of Wondershare Virbo Live
- Wondershare Virbo Live offers a wide range of compatibility to go live on different social media platforms. You can integrate live streaming with all major platforms, including YouTube, TikTok, and more.
- You also get to use different AI avatars or VTubers that reflect different attire, poses, and ethnicities. Plus, it allows you to customize your avatar for every live session.
- The cloud-based support helps you manage things without downloading. You can also operate the platform flexibly without any restrictions.
Get Started Online Free Download
Comprehensive Guide to Creating a Streaming Room in Wondershare Virbo Live
Wondershare Virbo Live redefines your way of interacting with viewers. It has even made TikTok livestream shopping fun for sellers and shoppers with advanced AI features. Therefore, analyze the following steps to know how to create a stream room with this interactive tool:
Step 1. Open the Platform and Create Your Stream Room
First, open the official website of Virbo Live to access the online tool. Once you open the platform, you will see the information on the main interface. Select the “Create Stream Room Now” function on this window to proceed.
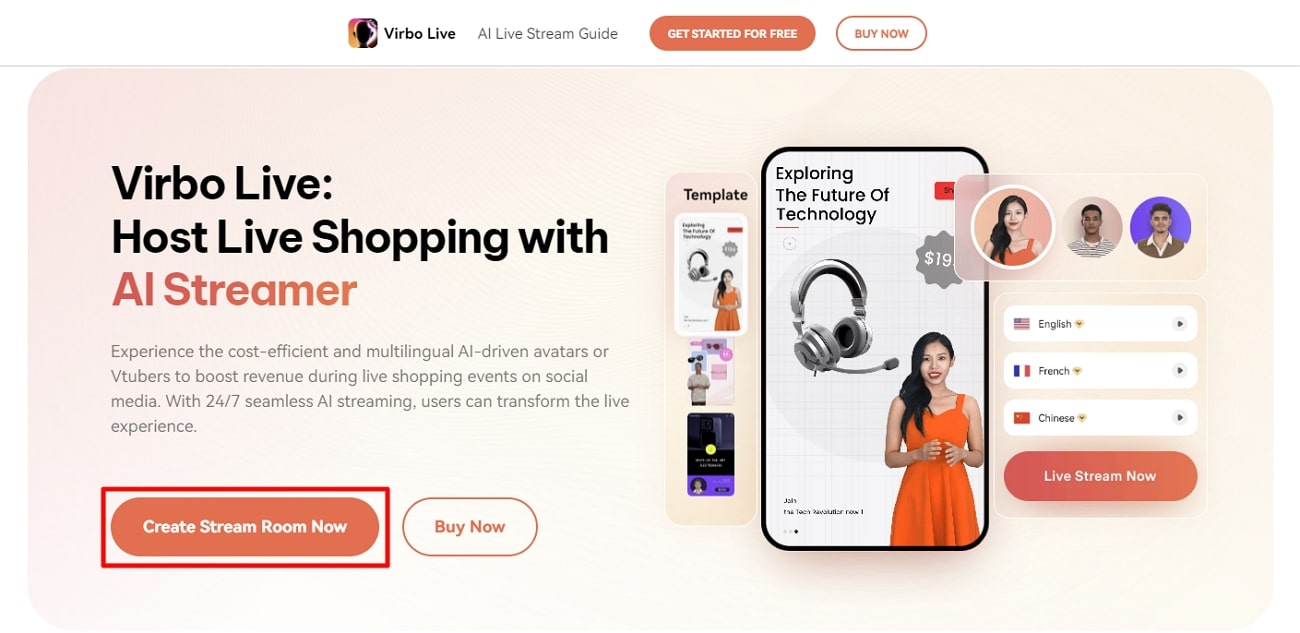
Get Started Online Free Download
Step 2. Create a Blank Livestream Room To Access Editing Window
After that, the tool’s home screen opens with several customization options. Next, click the “Create a Blank Livestream Room” button to create your livestream room with personalization.
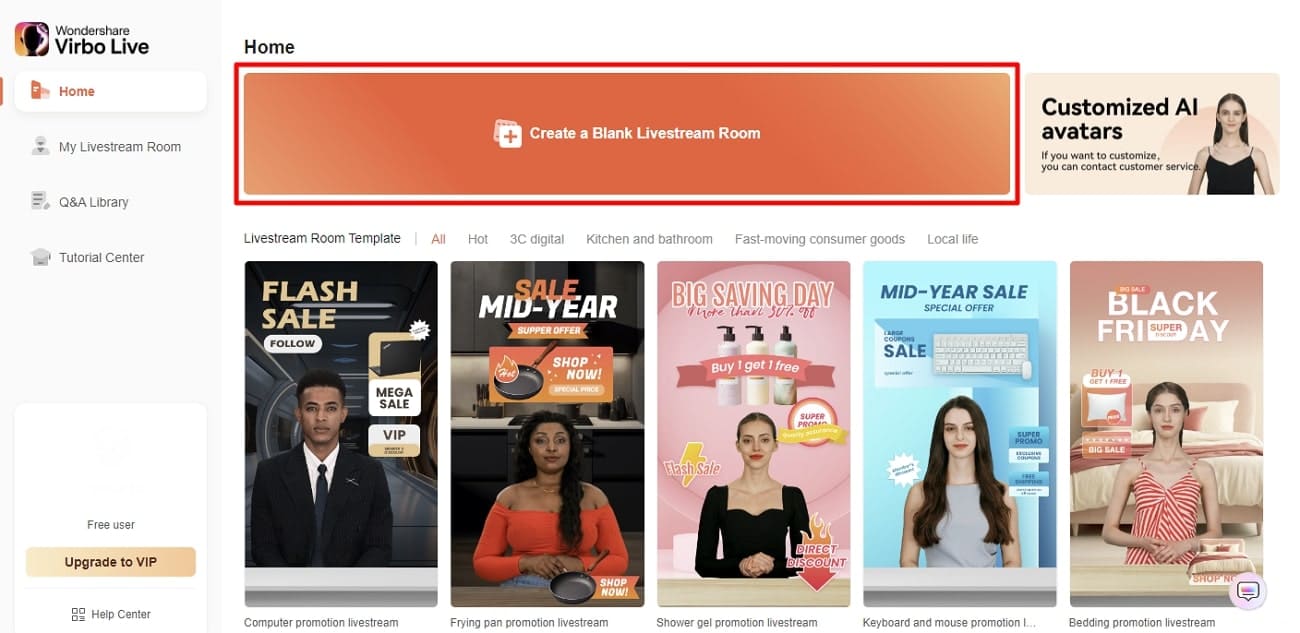
Step 3. Insert Text or Navigate to the AI Smart Script Function
The next screen shows multiple features to let you create a live stream. For that, click on the “Text” option on the left side of the display. Type or paste your dubbing content in the text box. You can also choose the “AI Smart Script” option at the bottom left corner to instantly add your prompt and generate a script.
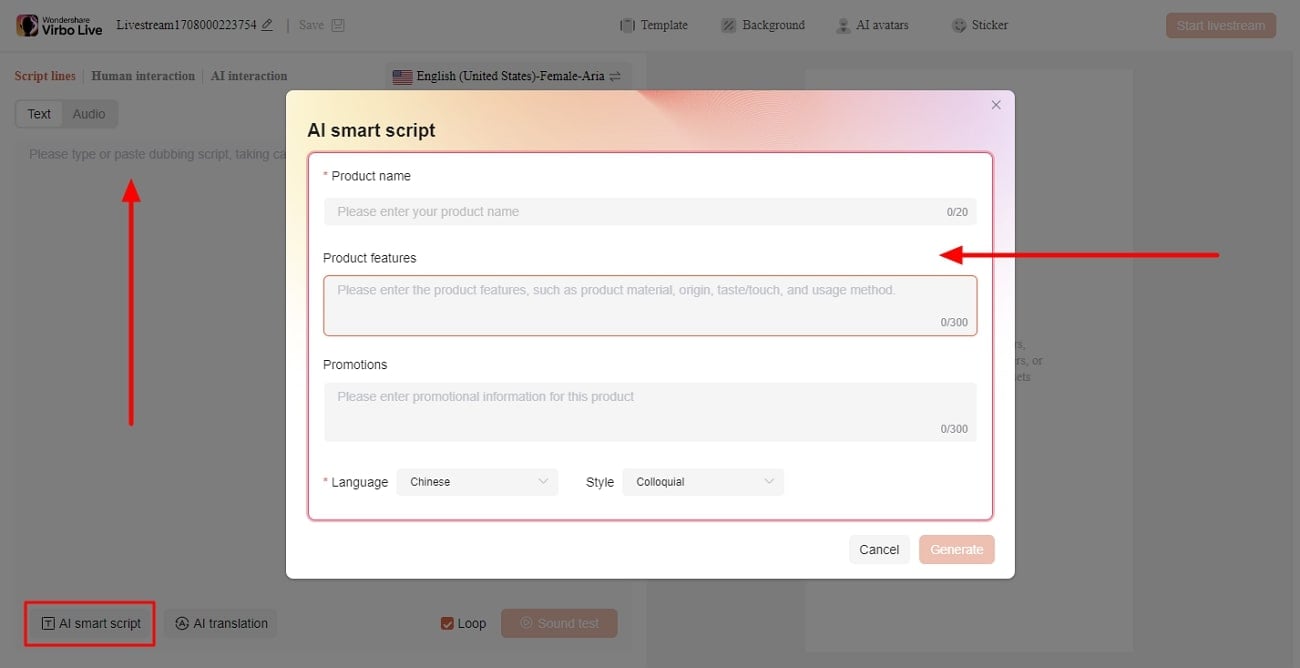
Step 4. Choose AI Avatars To Showcase Your Personality
Choose the “AI Avatars” tab from the given options in the top bar. It displays various avatars with a variety of poses and attire. Before moving forward, preview your favorite AI avatar on the right side.
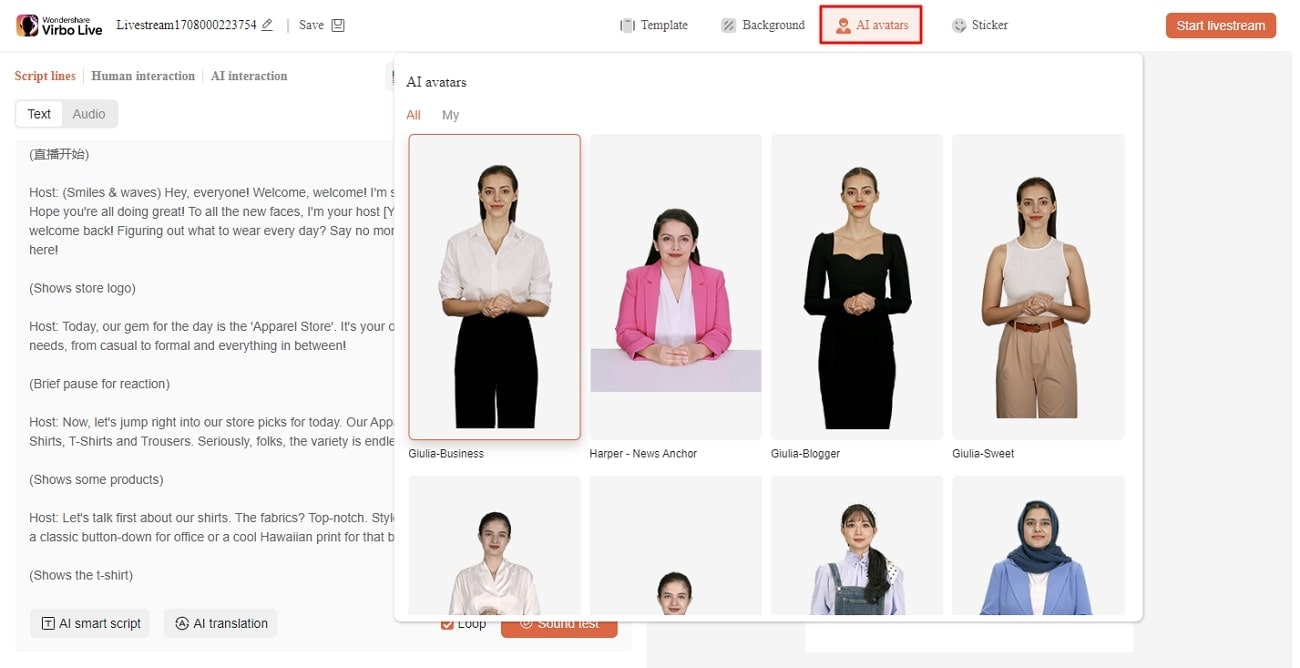
Step 5. Try Different Backgrounds and Templates
In the top navigation bar, hit the “Background” tab to see different background options. Depending on live streaming requirements, you can customize the background. Conversely, you can try the “Template” section according to your needs and wants.
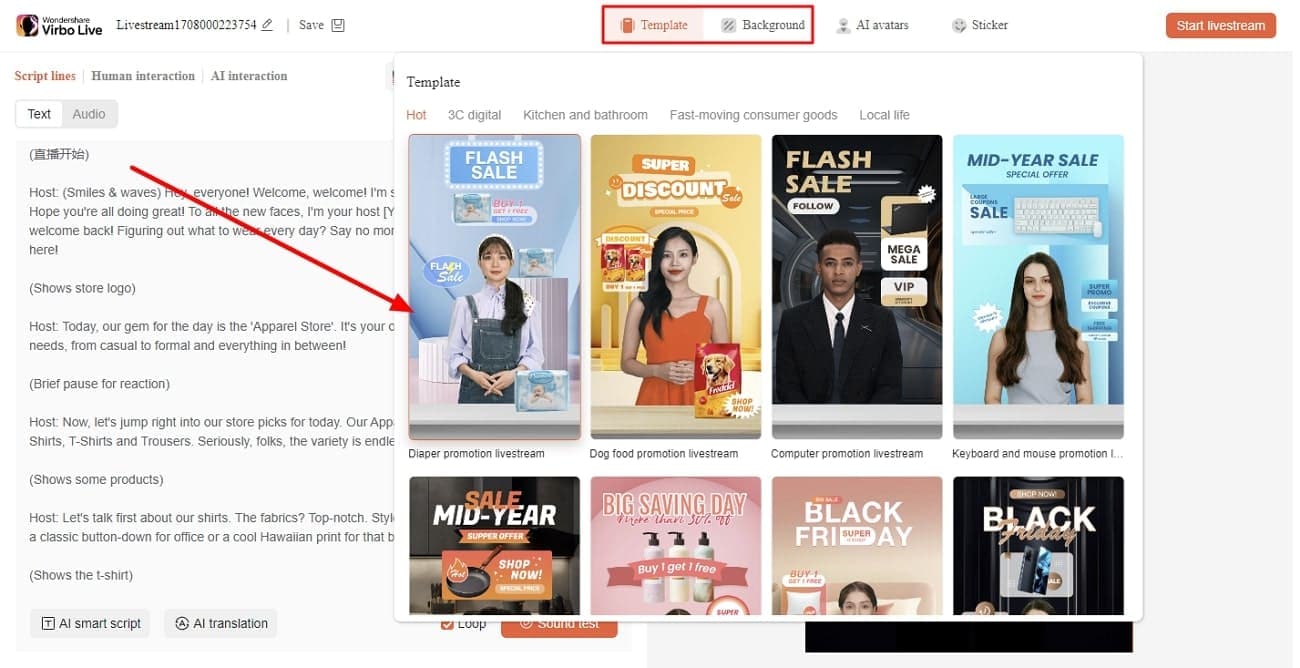
Step 6. Initiate Your Livestream for Live Selling
Once you have selected everything according to the requirements, you can start. Lastly, hit the “Start livestream” button at the top right corner to give your viewers a personalized experience.
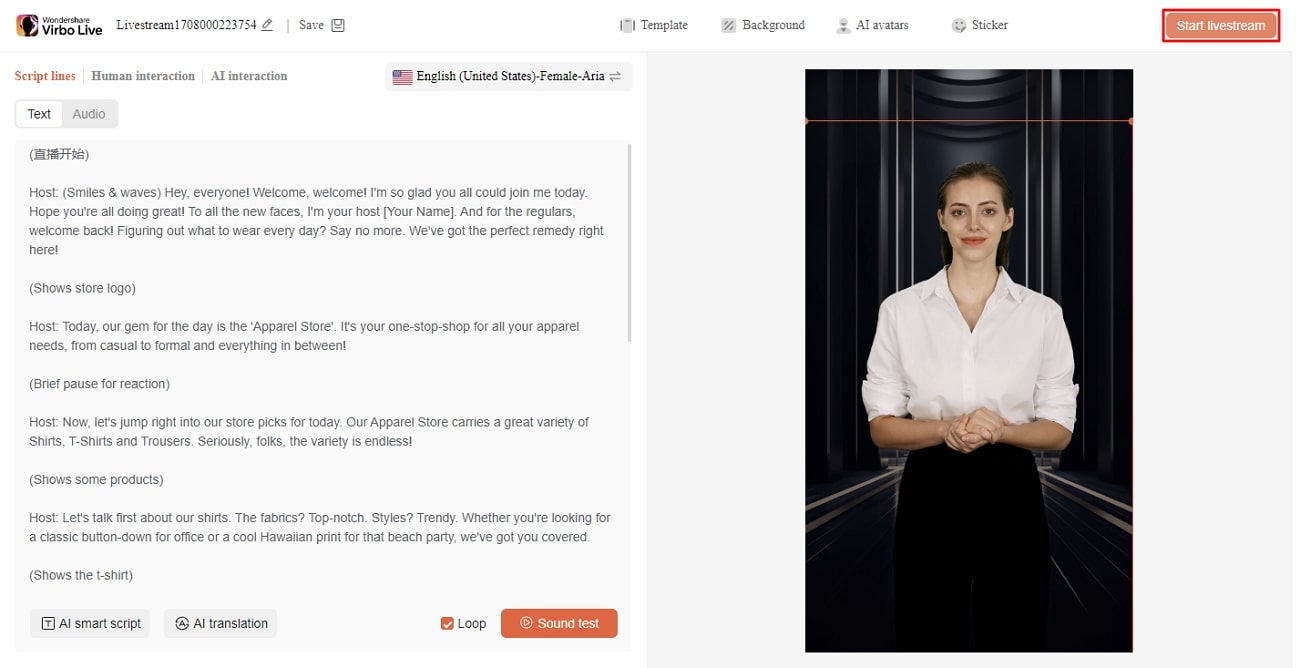
Tip 2. Properly Plan Your Livestream
It won’t be a good impression if you make mistakes in real-time interaction with viewers. Thus, make sure to prepare yourself before going to a live stream. To plan appropriately, collect the data and make an outline or presentation. You can livestream according to outlines and present your products.
Tip 3. Gain Expertise in TikTok Features
Becoming a proficient user of TikTok features would be a plus for you. The first feature is its “Enhance” mode, which presents beauty filters to improve your appearance. The flip camera helps show something in front during live without moving the camera away. You can also share your live stream and filter your comments in real-time using TikTok.
Tip 4. Check TikTok Analytics
Having a huge number of followers is not enough. You should also analyze when most of your audience stays active for a greater reach. For this, TikTok Analytics helps to supervise the viewers’ activities during specific intervals. Besides, you can also survey viewers to better understand which time is preferable for the maximum audience.
Tip 5. Promote Your Broadcast
TikTok live selling improves when you engage with a broad audience. You can try multiple ways to promote your livestream and get more viewers. One way is to share your live stream link on other platforms or directly text the people. The second method is that you can create a promotional video of the scheduled live event. Viewers can watch your video as a trailer of the event to hype their interest.
Conclusion
Apart from creating content, TikTok live shopping trends are rising gradually. Therefore, this article presents a detailed guide about working, rules, benefits, and process of live selling on TikTok. We have also introduced Wondershare Virbo Live, which helps you grow on different platforms like TikTok. It provides exceptional compatibility and usability to facilitate users anytime and anywhere.
Various social media platforms are helping businesses to elevate live shopping industry trends. TikTok is one of them and has become an integral part of content creators’ lives. Besides producing content, many professionals use TikTok for its selling ecosystem. It even allows people to adapt new online advertising techniques through live-stream events.
In this article, you will get insights about the working algorithm and rules of TikTok livestream shopping. You will also explore an advanced live-streaming platform. Moreover, you can learn some practical tips here to stand out as a leading seller on TikTok.
Part 1. What Is TikTok Live Shopping and How Does It Operate?
**TikTok Live Shopping is an innovative online advertising strategy introduced by TikTok in 2021. This feature has integrated live streaming into the e-commerce environment. Brands can showcase their products through real-time events. Unlike traditional marketing tactics, it helps to engage with customers directly for a global reach. Other than that, brands can advertise with engaging in-feed videos on TikTok to increase sales.
Shoppers can discover and purchase products and checkout directly within TikTok. They can also explore new brands by tapping the shop icon and checking the items recommended by the TikTok community. According to legitimate statistics , 67% of users say that TikTok marketing inspires them to buy something when they don’t even think about it.
How Does TikTok Live Shopping Operates?
Marketers can operate TikTok Live selling through live streaming and e-commerce. For this process, sellers start live streams and demonstrate their products or services. After going live, they can pin specific items to make them appear on screen for buyers. Also, they can schedule a live stream to get more time for preparation and promotion.
When shoppers interact with them, they can buy directly within the app by providing links or buttons. So, there is no need to go out of the platform and surf other websites. Moreover, they can make transactions through integrated payment gateways. Then, sellers ensure fulfillment and smooth delivery of the produce.
Why Is TikTok Live Shopping Beneficial in the Current Digital Industry?
TikTok is the fastest-evolving network, with over one billion users worldwide. Therefore, it is attractive for brands to advertise products and grow their profile. The following are some major benefits of the TikTok Live shopping experience:
- Global Reach: An extensive user base makes TikTok more beneficial for professionals. They can go live from anywhere and showcase their products or services to find potential customers.
- Sales Boost: Sellers can provide discounts or offers to shoppers during live stream to increase their sales. A report shows that 40% of Gen Z TikTok users have purchased at least one product while watching live-streaming content.
- Real-Time Interaction: The TikTok algorithm lets sellers connect with audiences in real time. It even helps build trustworthy customer relationships that increase sales over time.
- Engaging Platform: TikTok has cemented its position as one of the top-most engaging platforms. It provides exceptional broadcast features and controls. About 18% of marketers and brands use TikTok for marketing and live shopping events.
Part 2. Rules To Obey While Using TikTok Live Selling Feature
Like every social media platform, TikTok has some requirements to use the live session feature. For this, you need to be at least 18 years old and have a minimum of 1000 followers. Besides, there are some rules to obey while using TikTok live. According to TikTok’s community guidelines , your content should be respectful and updated. Also, it should not address deceptive terms or violate human life.
How To Go Live on TikTok for Live Selling?
After knowing the requirements and rules, the query is how to do TikTok live selling through livestream. For this purpose, follow the simple steps to go live with your TikTok account.
Step 1. Launch the TikTok app and tap on the “+” icon at the bottom-center of the app display. It takes you into the video creation mode, and there, you slide the bottom menu bar to select the “LIVE” option.
Step 2. After that, tap “Add a Title” to write a creative title for the livestream within 32 characters. Lastly, hit the “Go Live” button to initiate your live streaming.
How To Schedule a Live Shopping Event on TikTok?
Apart from going live simply, TikTok allows you to schedule live shopping events to get more time for preparation. Here’s how to schedule a TikTok livestream shopping event step by step.
Step 1. First, open the TikTok app and tap the “Calendar” icon at the top-right corner. Proceed to select “Create an event” on the continuing page. It then asks you to enter “Event Name” of a maximum of 32 characters and “Start Time” to set the event duration.
Step 2. Afterward, write a “Description” of the event to define it within 200 characters. Lastly, tap on “Create,” and your event will go under review for approval. Once your live shopping TikTok event gets approved, you can see it on your profile.
Part 3. Tips That Can Make You the Next Big Seller on TikTok Live Shopping
Many platforms are out there for selling on TikTok Live, and the competition is touching the sky. Therefore, you have to take smart steps to survive in the live shopping ecosystem. To help you become the next big seller on TikTok live shopping**,** we have discussed some simple tips here:
Tip 1. Using Wondershare Virbo Live To Make Engaging Livestreaming Content
For effective live selling, you need an efficient live-streaming platform. At the moment, Wondershare Virbo Live stands out as the best platform to host result-oriented live shopping events on social media. It helps you counter the language barriers with AI integration of multiple accents and languages.
It allows you to generate creative scripts for live shopping to save time and effort. Moreover, the built-in AI system helps you translate text and generate AI voice. So, you can reach a global audience to allow them to experience live shopping. It enables you to interact with the audience smartly through automatic responses. You can also set up a personal Q&A database for prompt responses.
Important Characteristics of Wondershare Virbo Live
- Wondershare Virbo Live offers a wide range of compatibility to go live on different social media platforms. You can integrate live streaming with all major platforms, including YouTube, TikTok, and more.
- You also get to use different AI avatars or VTubers that reflect different attire, poses, and ethnicities. Plus, it allows you to customize your avatar for every live session.
- The cloud-based support helps you manage things without downloading. You can also operate the platform flexibly without any restrictions.
Get Started Online Free Download
Comprehensive Guide to Creating a Streaming Room in Wondershare Virbo Live
Wondershare Virbo Live redefines your way of interacting with viewers. It has even made TikTok livestream shopping fun for sellers and shoppers with advanced AI features. Therefore, analyze the following steps to know how to create a stream room with this interactive tool:
Step 1. Open the Platform and Create Your Stream Room
First, open the official website of Virbo Live to access the online tool. Once you open the platform, you will see the information on the main interface. Select the “Create Stream Room Now” function on this window to proceed.
Get Started Online Free Download
Step 2. Create a Blank Livestream Room To Access Editing Window
After that, the tool’s home screen opens with several customization options. Next, click the “Create a Blank Livestream Room” button to create your livestream room with personalization.
Step 3. Insert Text or Navigate to the AI Smart Script Function
The next screen shows multiple features to let you create a live stream. For that, click on the “Text” option on the left side of the display. Type or paste your dubbing content in the text box. You can also choose the “AI Smart Script” option at the bottom left corner to instantly add your prompt and generate a script.
Step 4. Choose AI Avatars To Showcase Your Personality
Choose the “AI Avatars” tab from the given options in the top bar. It displays various avatars with a variety of poses and attire. Before moving forward, preview your favorite AI avatar on the right side.
Step 5. Try Different Backgrounds and Templates
In the top navigation bar, hit the “Background” tab to see different background options. Depending on live streaming requirements, you can customize the background. Conversely, you can try the “Template” section according to your needs and wants.
Step 6. Initiate Your Livestream for Live Selling
Once you have selected everything according to the requirements, you can start. Lastly, hit the “Start livestream” button at the top right corner to give your viewers a personalized experience.
Tip 2. Properly Plan Your Livestream
It won’t be a good impression if you make mistakes in real-time interaction with viewers. Thus, make sure to prepare yourself before going to a live stream. To plan appropriately, collect the data and make an outline or presentation. You can livestream according to outlines and present your products.
Tip 3. Gain Expertise in TikTok Features
Becoming a proficient user of TikTok features would be a plus for you. The first feature is its “Enhance” mode, which presents beauty filters to improve your appearance. The flip camera helps show something in front during live without moving the camera away. You can also share your live stream and filter your comments in real-time using TikTok.
Tip 4. Check TikTok Analytics
Having a huge number of followers is not enough. You should also analyze when most of your audience stays active for a greater reach. For this, TikTok Analytics helps to supervise the viewers’ activities during specific intervals. Besides, you can also survey viewers to better understand which time is preferable for the maximum audience.
Tip 5. Promote Your Broadcast
TikTok live selling improves when you engage with a broad audience. You can try multiple ways to promote your livestream and get more viewers. One way is to share your live stream link on other platforms or directly text the people. The second method is that you can create a promotional video of the scheduled live event. Viewers can watch your video as a trailer of the event to hype their interest.
Conclusion
Apart from creating content, TikTok live shopping trends are rising gradually. Therefore, this article presents a detailed guide about working, rules, benefits, and process of live selling on TikTok. We have also introduced Wondershare Virbo Live, which helps you grow on different platforms like TikTok. It provides exceptional compatibility and usability to facilitate users anytime and anywhere.
Also read:
- [Updated] 2024 Approved Top-Rated MP4 Video Save & Review
- [Updated] Rise Above the Rest One-Person Podcast Mastery
- 2024 Approved Unleashing Widespread Engagement on Facebook
- In 2024, What Pokémon Evolve with A Dawn Stone For Oppo A56s 5G? | Dr.fone
- New Boost Sales with Live Shopping Learn Winning Strategies From Top Brands
- OpenAI Explained: Everything You Need to Know
- Trust Issues with Independent GPT Tools?
- Unveiling the Secrets of Shopee Livestream Selling System
- Updated In 2024, Talkshoplive Reviews & Pro Tips Is This the Live Commerce Tool You Need?
- Updated Top List Best Livestream Shopping Apps Of for 2024
- Updated YouTube Live Selling Boost Your Sales With These Tips for 2024
- Title: New Ultimate Guide How to Live Stream on Facebook, In 2024
- Author: Jeff
- Created at : 2025-02-15 16:00:40
- Updated at : 2025-02-19 16:21:43
- Link: https://ai-live-streaming.techidaily.com/new-ultimate-guide-how-to-live-stream-on-facebook-in-2024/
- License: This work is licensed under CC BY-NC-SA 4.0.